QuickBooks Barcode Generation Tutorial
Add Barcodes to QuickBooks Printed Forms
This QuickBooks barcode tutorial is designed to help users integrate barcode generation functionality into existing QuickBooks reports for direct printing.
- Create Self-Checking Barcodes for Invoices
- Scanning barcodes into QuickBooks
- Import Barcodes into QuickBooks Forms and Templates
- Barcode Support for QuickBooks
Create Barcodes on Invoices
- This tutorial was created for QuickBooks Pro 2014 and uses Code 39 Barcode Fonts, which support numbers and upper-case letters to add a barcode to an existing QuickBooks invoice form. Unfortunately, the online version of QuickBooks does not allow the user to add or call additional fonts.
- Download and install the Code 39 Barcode Font for encoding numbers and/or upper-case letters or the Codabar Barcode Font for numbers only.
- After installation, restart the application so QuickBooks can reload with the new fonts.
- To begin, on the opening splash screen, choose Create Invoices.
- Click Manage Templates from the Formatting Drop Down Menu.
- Select an Invoice and click Copy to create a duplicate and save the original.
- Change the name of the template. In this case, Barcode Invoice is used, and click OK at the bottom to open.

- The Basic Customization screen will open by default. Click the
Additional Customization button at the bottom:

This will open up the next screen with the available fields available to add to the different sections of the invoice. Verify that the item to be barcoded has a checkmark next to it, as in this example and tutorial where the Invoice No. will be barcoded.
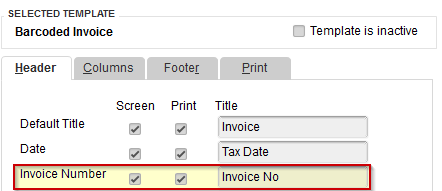
- Click the Layout Designer button located on the bottom side
of the screen.
- Rearrange the fields in the layout designer so that the Invoice No. or other
field has enough height and width
to display the barcode.
Note: The field that contains the data is labeled Sample and this will contain the barcode. In this case, the Date and Invoice fields have been placed to the left and then the Invoice No field is stretched to the right and downward, making it wider and taller.
- In the QuickBooks layout designer, double-click on the Invoice
# field and choose the IDAutomationHC39M
font, and change the point size of the font to 12.
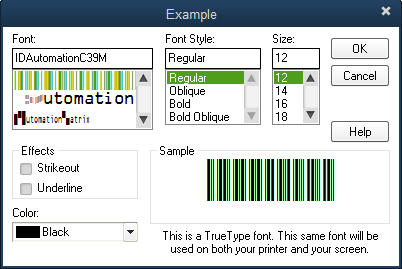
- Select OK at each screen until the new template is saved.
- Choose Customers - New and change the template
to the new "Barcode Invoice" that was just created.

- In the invoice number field, add an asterisk
(*) to the beginning and end of the existing number. After this, any new invoices created will contain asterisks at
the beginning and end. This is required as a start and stop character
for the Code 39 or Codabar barcode fonts to create an accurate barcode.

- The newly created QuickBooks form may not look the same on the screen because
it is intended for printing.
When printed, the barcodes should print in the newly
created form.

Scanning in QuickBooks
Scanning barcodes in QuickBooks improves lookup time and reduces data entry errors. Using a USB barcode scanner with a built-in decoder is best because of the ease of use. All of the scanning hardware available at IDAutomation has built-in decoders that can read several different barcode types.
Below is an example of how using barcodes improves lookup time and reduces data entry errors in receiving an invoice with a payment from a customer.
- Program the scanner to either include or append start and stop characters in the data returned from the barcode for lookup, since this is now part of the invoice number. The barcode scanner may be programmed to include a return function after the barcode is scanned which will usually invoke the Find or Search buttons.
- In QuickBooks, select Edit - Find.
- Position the cursor in the Invoice # field and scan the barcode.
The data from the barcode is sent into the field via keyboard emulation
technology and the return
function chooses the Find button accordingly.
Create Barcodes for Purchase Orders and Pick Tickets
Adding barcodes to warehouse pick tickets will ensure employees add the correct items to a customer's shipment, thereby increasing accuracy and decreasing mistakes. By barcoding the item number, warehouse workers can scan the barcode on the Pick List, locate the item, and verify the barcode on the item matches after scanning it as well.
This tutorial was created using QuickBooks Pro 2014 for creating barcodes on an Item List and uses Code 128 Barcode Fonts, which is a high-density linear symbology that encodes text, numbers, numerous functions, and the entire 128 ASCII character set. Code 128 Barcodes must have the data encoded before applying the font, using the Barcode Macros and VBA Functions or Excel Barcode Add-In will automate this process easier. QuickBooks allows a user to import an Excel Spreadsheet with the encoded values as well as the rest of the product information but will need to be set up before import.
- First, a barcode column must be added to the QuickBooks Item List, to be able to import the barcode field. To do this, go to Lists - Templates and locate the Custom Purchase Order Template, and double-click to open the Basic Customization screen.
- Click on Additional Customization at the bottom of the screen and then go to the Columns tab and enable MPN for Manufacturer Part Number, which is already in the list. This will be the field that this tutorial will select to barcode.
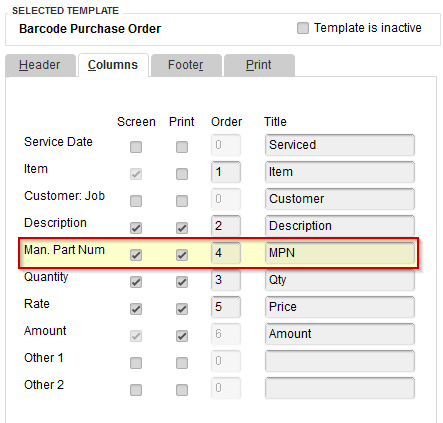
This screen will also allow changes to the order of the columns. - Open the Layout Designer, double click on the MPN column,
where the 'sample text' is, first Center the text and click the
Font button to change the font to the Code 128 Font, and adjust the point size to at least 12pts.
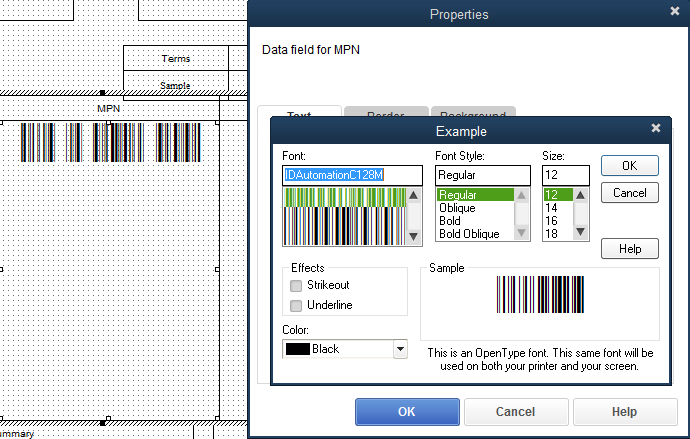
- Adjust the columns to see the full barcode.
- Click OK until the changes have been saved and the screen is closed out.
- Next, the Excel Spreadsheet will need to be formatted and set up to be imported into the Item List.
Visit the Excel VBA Barcode Tutorial or Barcode Add-in for Excel Tutorial for assistance with encoding the data to be barcoded. - To begin the Import, go to File - Utilities - Import - Excel Files to open the Add Your Excel Data to Quickbooks and click on the Advanced Import option on the right-hand side.
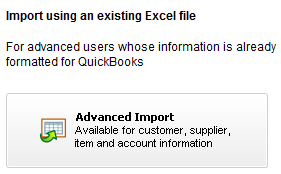
- On the Import a File screen, browse to the Excel Spreadsheet created previously with the encoded data, select the sheet in the workbook, and check that the file has header rows.
- Under the Data Mapping section, select <Add New> from the pull-down menu
next to Choose a mapping drop-down menu:
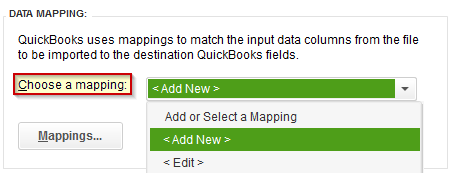
- Create a Mapping Name to save, as in this example Barcode Item List, and begin matching the Columns in the spreadsheet to the Fields in QuickBooks.
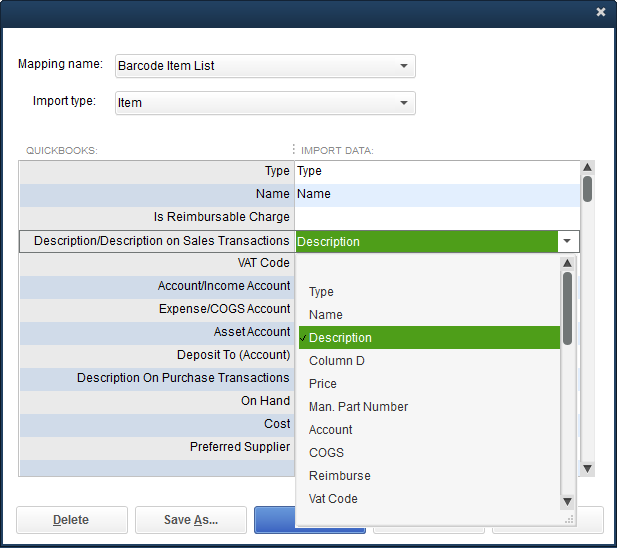
- Save the mapped data and preview to verify the correct mappings are set up and for any errors.
- Once the data has been verified, click the Import button and the data will be imported into the Item List.
- Open up the Item List from the List Menu and there will be the field of encoded data.
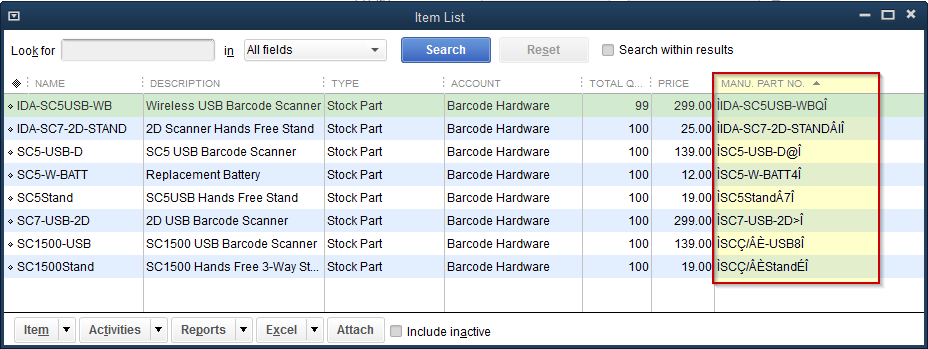
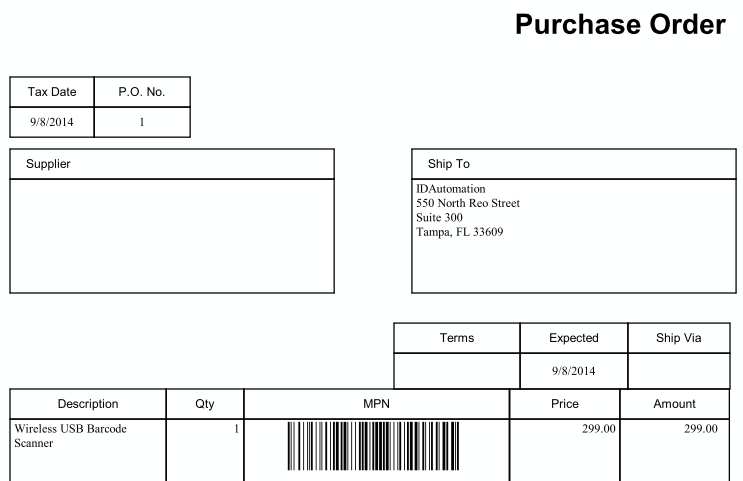
- This field can then be called into forms, as in this Purchase Order example, and printed.
QuickBooks Barcoding Problems and Solutions
Problems related to QuickBooks software must be directed to Intuit technical support. The information below is listed for convenience purposes only. However, if the barcode font is having problems, such as it does not appear in the font list, please follow IDAutomation's barcode font troubleshooting procedures.
- Printed Barcodes Do Not Scan
- QuickBooks Support Forum
- If printed invoices do not resemble the new template, confirm the correct template is chosen. Newly created invoices should always reflect the last selected invoice.
- For support with scanner-specific issues, contact the barcode scanner manufacturer directly.

