Using the Native Crystal Reports Barcode Generator in Visual Studio
The Native Barcode Generator for Crystal Reports may be integrated into several types of Visual Studio projects. The following is an implementation example integrating a Crystal Report containing a QR Code 2D Barcode with a Visual Studio ASP.NET website project.
User Manual Integration Support Buy License
The below instructions use Visual Studio 2022, Crystal Reports 35, and the IDAutomationQRCodeDEMO.rpt report for the Native Report Generator for Crystal Reports.
1. Prepare Your Environment
- Ensure you have Visual Studio 2022 or later installed on your system.
- Download and install the Crystal Reports Visual Studio package from the SAP official website, along with the 64-bit Crystal Report install.
- Verify that you have the ‘Microsoft C++ 2013 Redistributable’ from Microsoft.
2. Install the IDAutomation Native Generator
- Download and install the IDAutomation Native Reports Generator for Crystal Reports.
- This tutorial utilizes the DEMO version. If you are using the demo version it only contains static barcode data to prove functionality; the licensed version is fully functional.
3. Launch Visual Studio and Create a New Project
- Launch Visual Studio 2022.
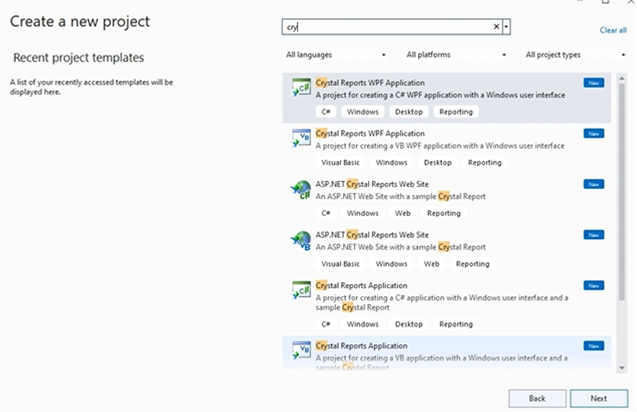
- Create a ‘New Project’.
- In this example ‘ASP.NET Crystal Reports Web Site’ is selected.
- Choose your framework, and create.
- Launch the project with the IIS, and ensure it is functioning before continuing.

4. Add the QRCode Report from IDAutomation
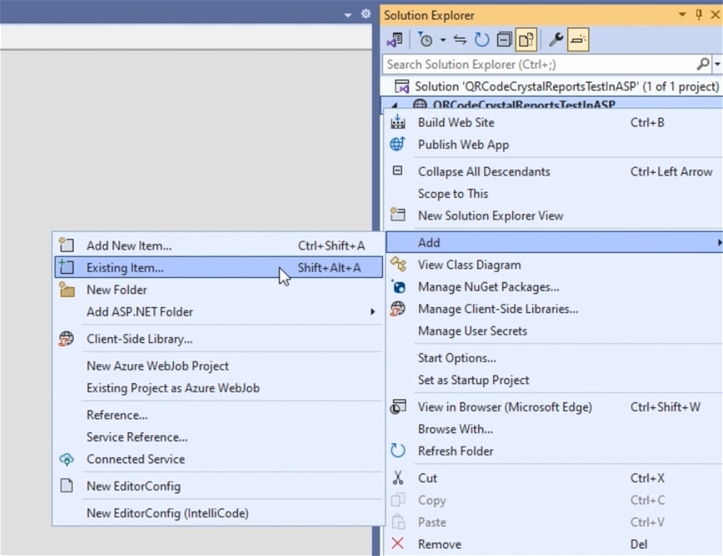
- Right-click the project in the Solutions Explorer and select ‘add existing item’.
- Select ‘all files’ and locate the IDAutomation QR Code Demo Report.
- Edit the formula in the QR Code object to connect to the database field. The demo versions will not update data in the symbols from the fields, only the license versions can do that.

5. Edit the ‘Default.aspx’ file:
- Update the report that loads, because we want to load the QR Code Demo.
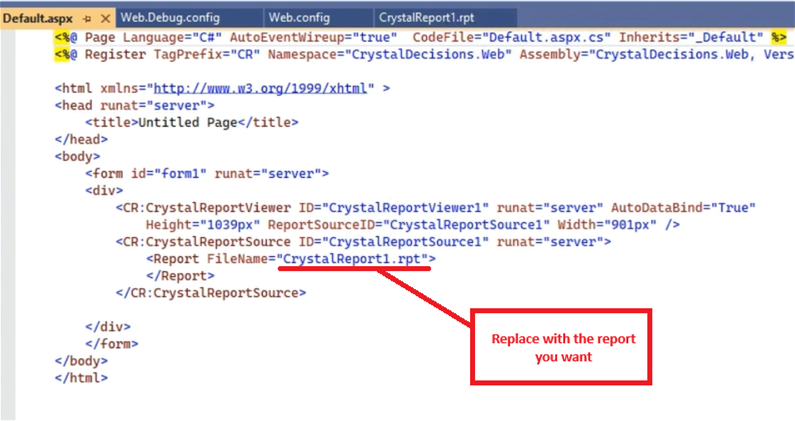
- Navigate to the ‘Default.aspx’ file.
- Replace the Report FileName=”CrystalReport1.rpt“ as the Report's name. I renamed the report “IDAutomationQRCode.rpt”.
- Once replaced, the report can be tested. Launch the report in the IIS and verify the report is generated.


