Azure Serverless Barcode Generator Function for Barcode Fonts
This tutorial describes how to create a QR Code Serverless Function in Azure for Barcode Generation with IDAutomation barcode fonts and a font encoder. Other barcode types such as UPC, EAN, GS1, PDF417, Data Matrix, and Code 128 may also be easily implemented using a similar process. Azure serverless functions are SaaS compute services designed to simplify software development and eliminate downtime and other issues that can be caused by hosting applications on a physical server.
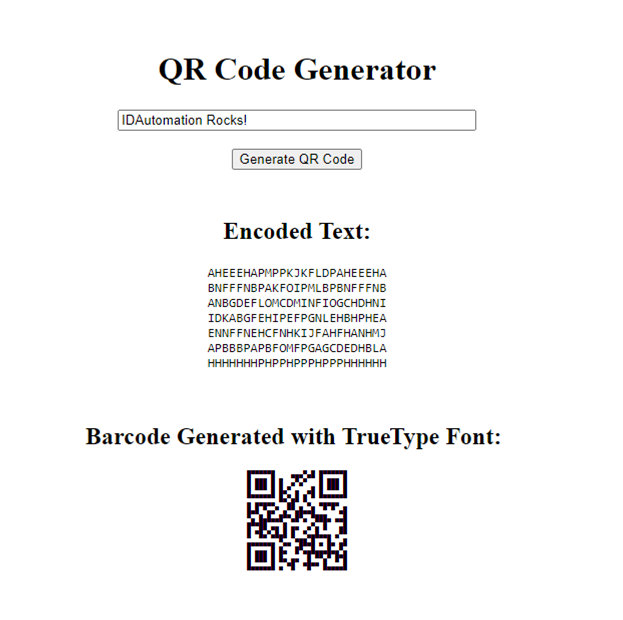
The walk-through illustrates the process of generating a QR code using the QR Code Font and Encoder suite. It utilizes Azure Functions to encode data, creates and displays it on a static webpage, and applies the IDAutomation2D font stored in a Blob Storage container to finish generating the barcode. The source code and Visual Studio project used to make this tutorial are available for download here. Alternatively, one can use the .NET Generator within Azure.
Prerequisites
- Azure Account: an Azure account with the ability to create resource groups and CORs editing capabilities.
- Visual Studio 2022 or greater.
- .NET 6 or greater.
- IDAutomation QR Code Font and Encoder Suite, Developer license or greater.
1. Setting Up the Project
- Open Visual Studio 2022, then select "Create a new project." Choose the 'Azure Function' template and name the project and solution.
- Find the options for .NET 6, and HTTPTrigger, and set the authorization level to anonymous - for simplicity during the demonstration (note: 'anonymous' is not the default recommendation).
- Run the project once to ensure a successful setup.
2. Setting Up the Blob
- Create a resource group, then establish a storage account within it.
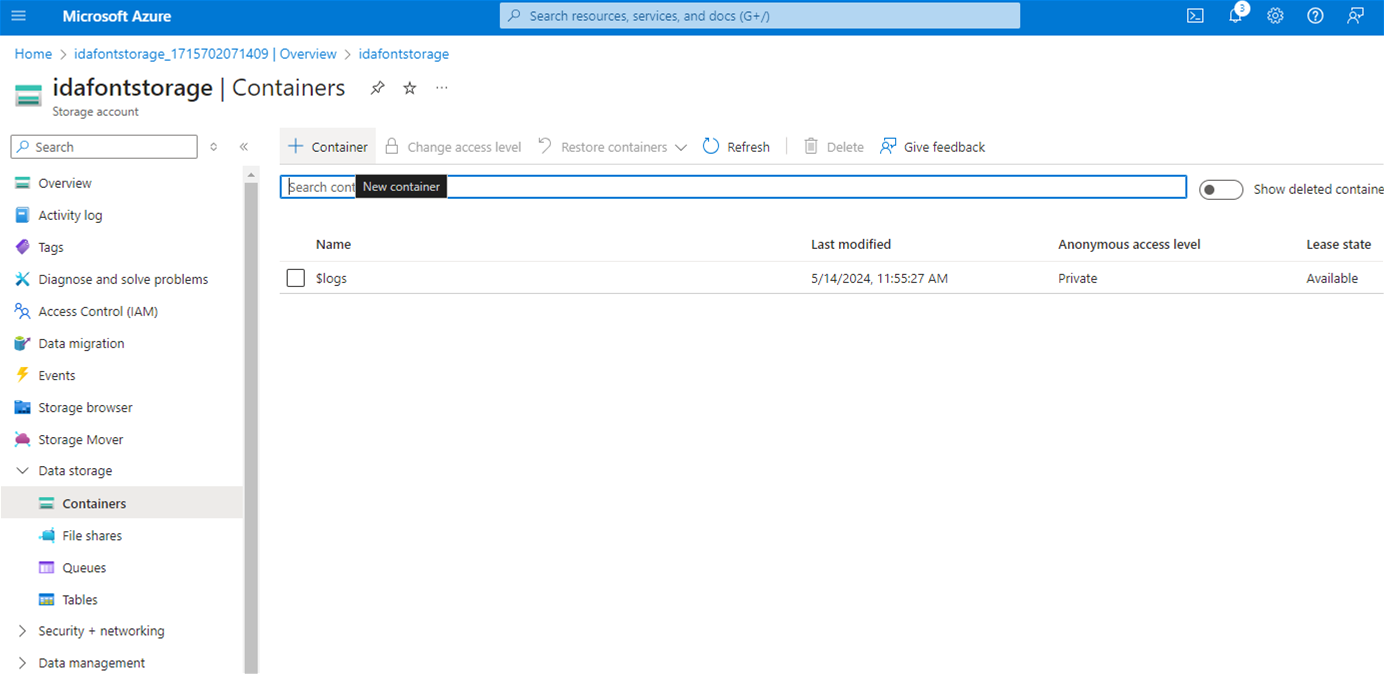
- Inside the storage account, create a container.
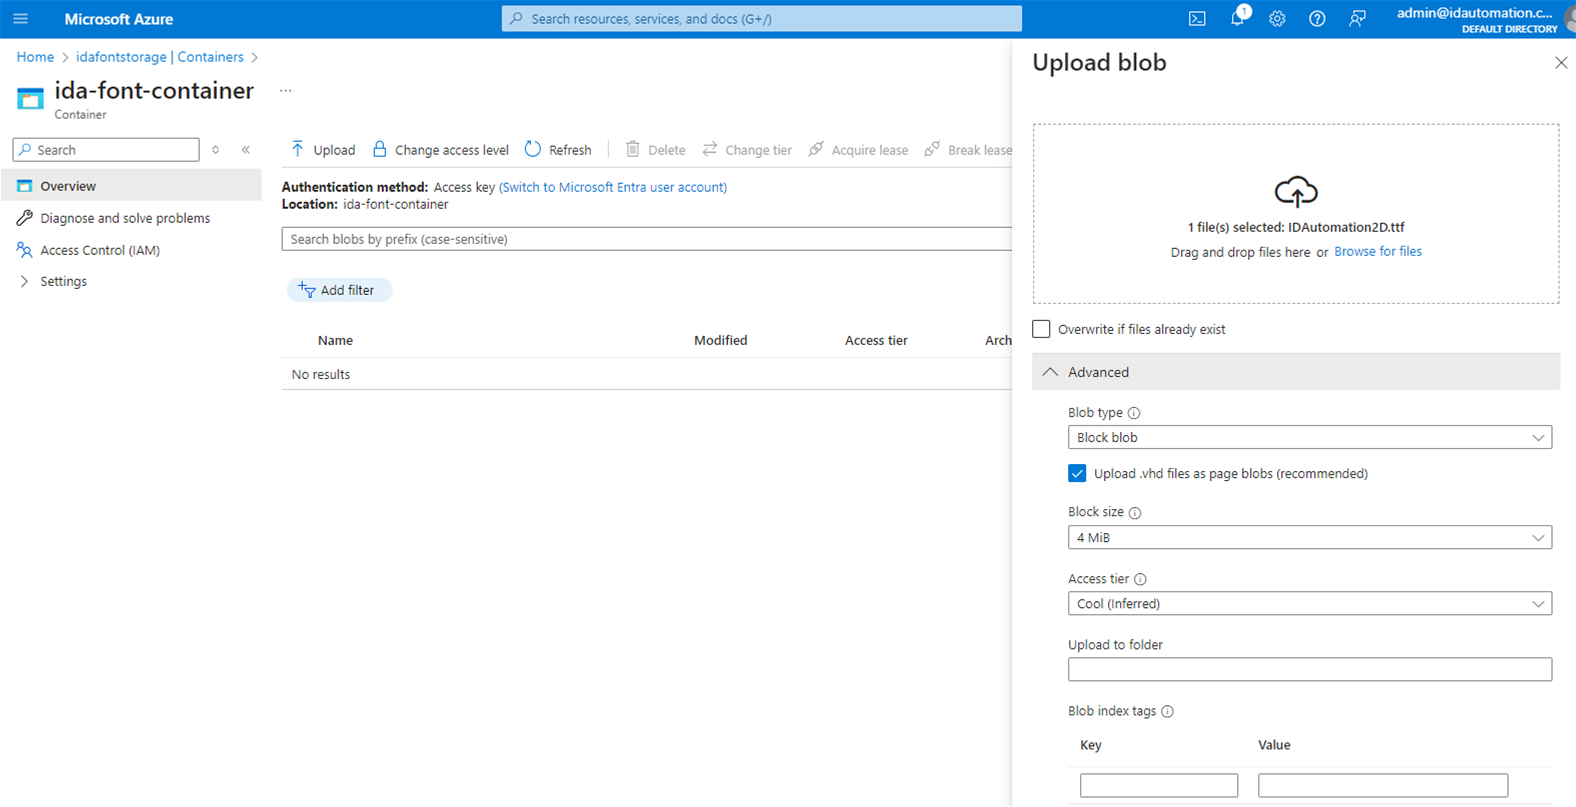
- Once within the storage container, upload the IDAutomation2D.ttf file to the block blob.
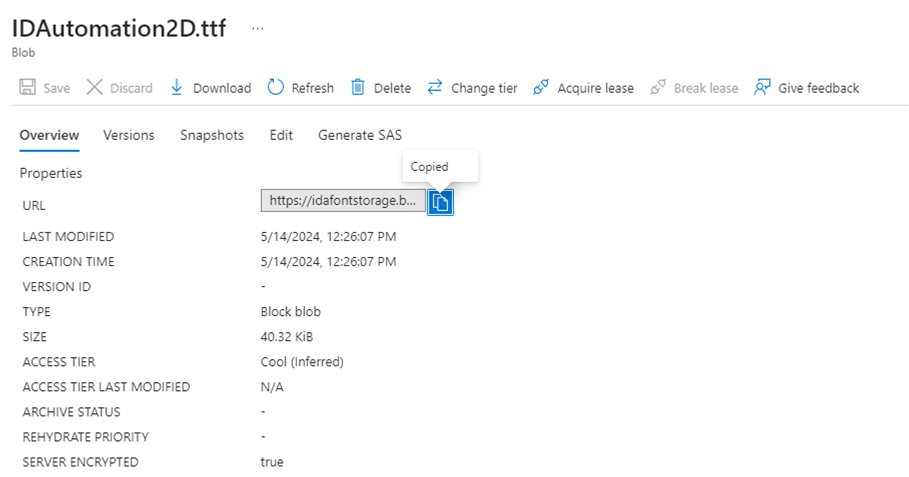
- Once uploaded, copy the URL, and paste it in a notepad for future use.
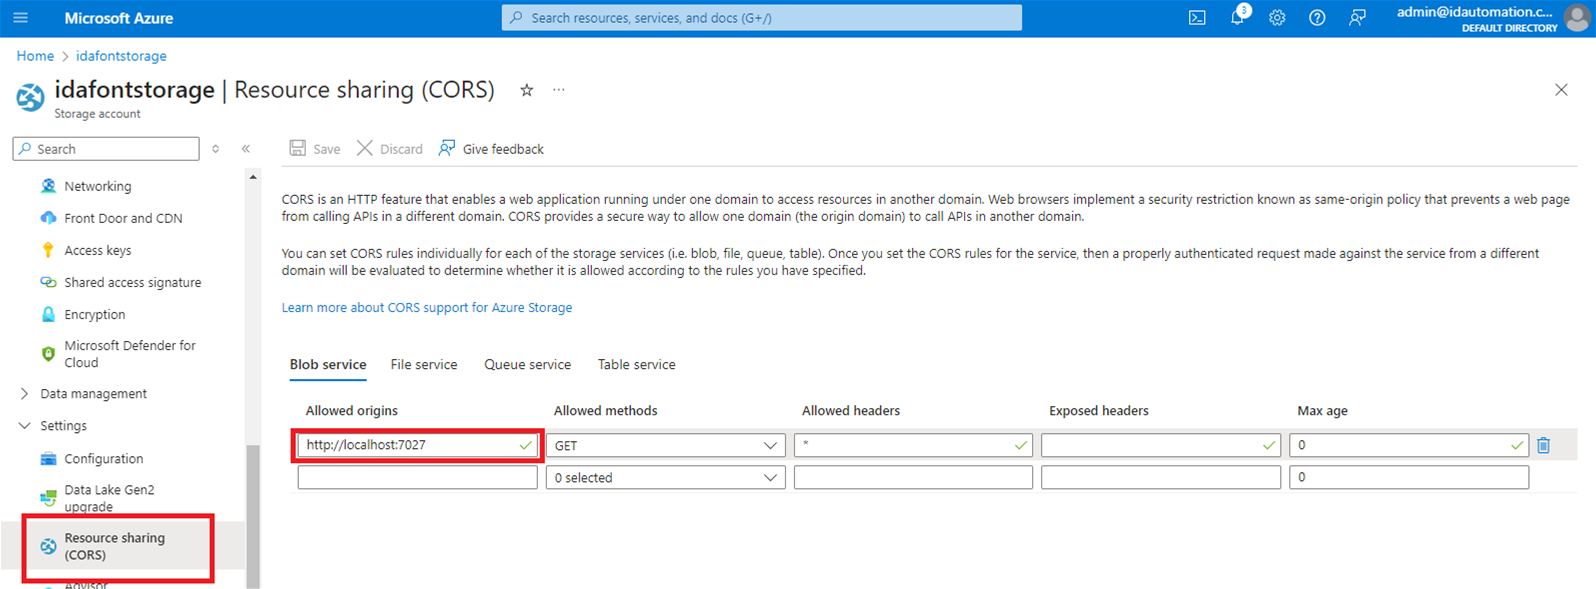
- In the Azure portal, navigate to Settings > Resource sharing (CORS), and add the localhost URL being used for testing purposes.
3. Code Implementation
- NOTE: The source code and Visual Studio project used to make this tutorial is also available to download.
- In the solution explorer, rename the 'Function1' class to 'QRCodeGenerator.'
- Add the IDAutomation .NET Dependency, either the DLL or source code file.
- The source file can be found in “C:\file\path\QRCode Font and Encoder\IDAutomation_QRCode_Developer_Tools\IDAutomation_QRCode_Developer_Tools.NET”, and the DLL can be located within the ‘Assembly Signed’ folder.
- Ensure the 'Copy to Output Directory' property is set to 'Newest' under 'Advanced' properties if using the source file.
- If using the DLL, set 'copy to local' to ‘yes’.
- Create a folder titled 'www' and include an index.html file, this is for the front end.
- Ensure the 'Copy to Output Directory' property for the index.html file is set to 'Always.'
- Replace the contents of the QRCodeGenerator class with the provided code:
  [FunctionName("QRCodeGenerator")]
  public static IActionResult Generate([HttpTrigger(AuthorizationLevel.Anonymous, "get", Route = null)] HttpRequest req, ILogger log)
  {
      try
      {
          string textToEncode = req.Query["text"];
          log.LogInformation("Generating QR Code for {0}", textToEncode);

          QRCode qr = new QRCode();
          string encodedText = qr.EncodeQR(textToEncode, true, EncodingModes.Byte, Versions.AUTO, ErrorCorrectionLevels.M, OutputTypes.IDA2DFont, false);

          return new JsonResult(new { encodedText});
      }
      catch (Exception ex)
      {
          log.LogError($"Error generating QR code: {ex.Message}");
          return new BadRequestObjectResult("Error generating QR code. Please check your input.");
      }
  }
- This function is triggered by HTTP GET requests due to the [HttpTrigger(AuthorizationLevel.Anonymous, "get", Route = null)] attribute.
- The function retrieves the value of the text parameter from the query string of the HTTP request.
- It then logs a message indicating the start of the QR code generation process.
- A new instance of the QRCode class is created to handle the generation of the QR code.
- The provided text is encoded into a QR code using the EncodeQR method of the QRCode class.
- If the QR code generation is successful, the encoded text is returned as a JSON result.
- If an error occurs during QR code generation, an error message is logged, and a bad request response with an error message is returned.
4. Form Implementation
- Above the 'Generate' function and the [FunctionName("QRCodeGenerator")] add in the below code:
    [FunctionName("Form")]
    public static HttpResponseMessage Form(
  [HttpTrigger(AuthorizationLevel.Anonymous, "get", Route = null)] HttpRequest req,
  ILogger log, ExecutionContext context)
    {
        string indexPage = File.ReadAllText(context.FunctionAppDirectory + "/www/index.html");

        var result = new HttpResponseMessage(HttpStatusCode.OK);

        result.Content.Headers.ContentType = new MediaTypeHeaderValue("text/html");
        result.Content = new ByteArrayContent(System.Text.Encoding.UTF8.GetBytes(indexPage));
        return result;
    }
- The function reads the content of the index.html file from the www directory of the function app using File.ReadAllText.
- It creates a new HttpResponseMessage object with a status code of OK.
- The content type of the response is set to text/html.
- The content of the index.html file is converted to a UTF-8 encoded byte array and set as the content of the response.
- If an error occurs during the process, an error message is logged, and a bad request response with a status code of 400 (Bad Request) is returned.
5. Create the Front-End
This index page is mostly for demonstration purposes, to visualize the QR Code Generation, Use of a traditional static webpage would be better for real-world purposes, but for simplicity's sake, this is the method taken.
- Erase the content of the index page and replace it with the following HTML, CSS, and JavaScript
- Be sure to replace the src: url in the @font-face with the url to the font storage being used.
<!DOCTYPE html>
<html lang="en">
<head>
    <meta charset="UTF-8">
    <meta name="viewport" content="width=device-width, initial-scale=1.0">
    <title>QR Code Generator</title>
    <style>
        @font-face {
            font-family: IDAutomation2D;
            src: url('https://url-to-the-storage-account-you-created.blob.core.windows.net/ida-font-container/IDAutomation2D.ttf') format('truetype')
        }
        body {
            line-height: normal;
            white-space: normal;
            text-align: center;
            padding-top: 10%;
        }
    </style>
</head>
<body>
    <div class="card">
        <h1> QR Code Generator</h1>
        <input id="inputbox" style="width: 350px;" placeholder="Enter text">
        <br /> <br />
        <button type="button" onclick="GenerateQRCode()"> Generate QR Code</button>
        <br /> <br />
        <div id="qrCodeContainer"> </div>
    </div>
  <script>
    function GenerateQRCode() {
        var xhttp = new XMLHttpRequest();
        xhttp.onreadystatechange = function() {
            if (this.readyState == 4 && this.status == 200) {
                var response = JSON.parse(this.responseText);
                var encodedText = response.encodedText.replace(/\r\n/g, "<br>");

                document.getElementById("qrCodeContainer").innerHTML = `
                    <div class="card" style="padding: 10px;">
                        <h2>Encoded Text:</h2>
                        <pre style="white-space: normal;">${encodedText}</pre>
                    </div>
                    <div class="card" style="padding: 10px;">
                        <h2>Barcode Generated with True Type Font:</h2>
                        <pre style="font-family: IDAutomation2D; white-space: normal;">${encodedText}</pre>
                    </div>
                `;
            }
        };

        var input = document.getElementById("inputbox").value;
        xhttp.open("GET", `/api/QRCodeGenerator?text=${input}`, true);
        xhttp.send();
    }
</script>
</body>
</html>
- The HTML code defines a webpage for generating QR codes.
- It includes an input box to enter text, a button to trigger QR code generation, and a container to display the generated QR code.
- The page uses CSS to style the layout and appearance. The font is created in the @font-face and pulls the font in from the Azure Blob Storage.
- .replace(/\r\n/g, "<br>") helps to stack the barcode into its 2D shape.
- JavaScript code is used to handle user interaction and trigger QR code generation via an XMLHttpRequest.
- Upon receiving the encoded text from the Azure Function, the JavaScript code updates the webpage to display the encoded text and the corresponding barcode generated using the IDAutomation2D font.
6. Publish to Azure
- Right-click the project and select "Publish."
- Create a new instance or use an existing one, but since the intention is to run the source code, uncheck the “Run from package file”.
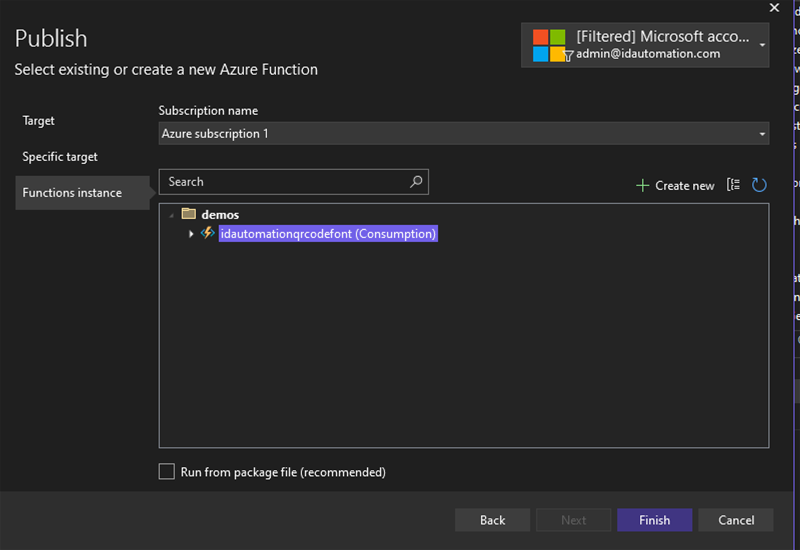
- Select the resource group and storage account created earlier.
- Copy the URL generated for the website and update the CORS policy in the storage account to include it.
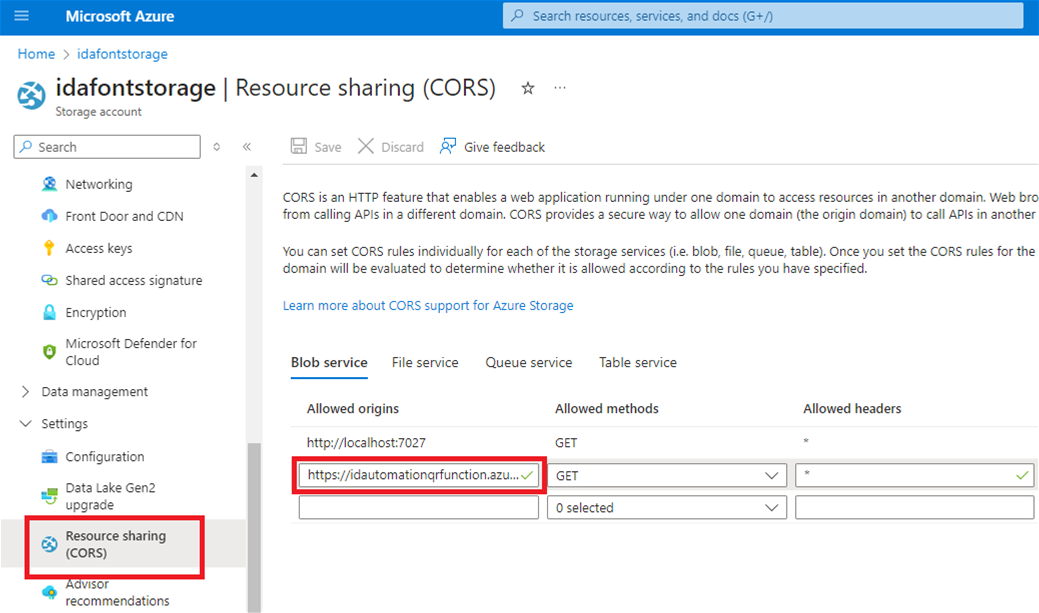
- Publish the function.
- Once published, navigate to the generated domain and append '/api/form' to the URL to access the QR Code Generator form.
By completing this tutorial, a user can better grasp the possibilities of utilizing IDAutomation's encoder and barcode fonts within Azure Functions, and how to make fonts accessible through Blob Storage utilization. This only scratches the surface of possibilities to increase productivity in the workflow.

