Barcode DLL for .NET CF User Manual & Tutorial
IDAutomation's Barcode DLL for .NET Compact Framework allows integration of dynamic barcodes into mobile apps using the Microsoft Compact Framework. Several linear and 2D barcode symbologies are supported including UPC, EAN, Code 128, Code 39, PDF417, and Data Matrix.
Buy License Support Download Demo Release Log
Environment Setup & Tutorial
This documentation refers to IDAutomation's Linear .NET Compact Framework DLL. Please make the following substitutions when using the PDF417 or Data Matrix components:
IDAutomaton.design.LinearBarcodeControl.dll = IDAutomation.design.PDF417BarcodeControl.dll
IDAutomationCFLinear.dll = IDAutomationCFPDF417.dll
IDAutomaton.design.LinearBarcodeControl.dll = IDAutomation.design.DataMatrixBarcodeControl.dll
IDAutomationCFLinear.dll = IDAutomationCFDataMatrix.dll
There are two components necessary when creating an application for the
.NET Compact Framework (CF). A design-time component (IDAutomation.design.LinearBarcodeControl.dll),
which can use all of the functionality of the full .NET Framework, and a
run-time component (IDAutomationCFLinear.dll), which uses only functionality
allowed by the Compact Framework.
The following steps outline the process for setting up the environment to
use the Compact Framework control:
- Copy the runtime and designer versions of the controls to the project directory. Do not copy the files to the BIN directory, they will be automatically copied there when deployed.
- Open the Smart Device Application project in Visual Studio .NET. If a current project does not exist, open the image generator sample project included in the downloaded zip file.
- If the Toolbox is not visible in the application, open the form the control is to be placed on and select View | Toolbox from the main Visual Studio.NET menu.
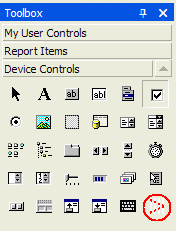
- Find the section in the Toolbox entitled Device Controls.
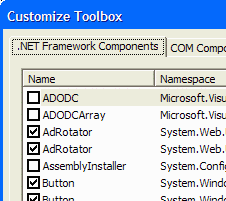
Right-click the Toolbox and choose Add/Remove Items. A
screen similar to the figure below will appear:

- Click the "Browse" button and select the designer version
of the control, IDAutomation.design.LinearBarcodeControl.dll,
click "Open", then click "OK" on the Customize Toolbox dialog.
The control should appear in the Toolbox, do not place the control
on the form yet.

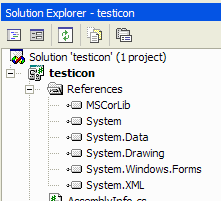
- Before dragging the control on a form, a reference must be set to the run-time version of the control, so that it is copied to the target device or emulator. This is done from Solution Explorer.
If Solution Explorer is not visible, click View | Solution Explorer.
Right-click "References" in Solution Explorer. Click "Add Reference".

- On the Add Reference dialog click "Browse", select the runtime version of the control IDAutomationCFLinear.dll, and click "Open". Click "OK" on the Add Reference dialog.
- The control should now be available to the Compact Framework Application.
Using the Component
Printing from the control:
The .NET Compact Framework does not include native support for printing from a Windows Mobile device. To print from one of these devices, clients will need to use the Windows CE API, or a third-party component specifically designed for printing from a Windows Mobile device such as the HP Windows Mobile Printing products.
IDAutomation has created a generic sample application available in this product that illustrates how to print a barcode image and text from a Windows Mobile device using the Windows CE API.
Before opening the sample project, please read the following notes regarding
the application and the Compact Framework:
- The Compact Framework includes no native support for printing. The sample application uses P/Invoke and the Windows CE API to do the printing.
- There are other ways to print from a Pocket PC device, such as printing directly to a printer through an I/O channel. Unfortunately, this method only supports text printing. Or, using a third-party vendor control for printing. Examples of such components include HP's direct printing or PrinterCE's control for printing.
- The print dialog box that appears in the emulator will be different based on the individual configurations of each machine. However, as long as there are print drivers loaded on the device, everything should work well.
- The example project is based on IDAutomation's Linear CF Control.
Other controls can be easily substituted for the Linear CF Control.
- To simplify the code, the only property being set of the control from the application is DataToEncode. That value is printed as text
and the barcode is then printed as a graphic.
- The Compact Framework has limited properties for bitmap objects.
Instead of saving the bitmap to a memory stream, the bitmap must be
copied pixel by pixel into a byte array so that it can be sent to the
Windows CE API.
- The main routine for writing the image to the printer is GdeGraphics.StretchDIBits
Placing barcodes in a PictureBox:
- This is a simple example of how to send the barcode bitmap to a
PictureBox:
pictureBox1.Image = barcode1.BMPPicture;
Dynamically placing the control on a form:
- This is how the barcode can be created on the form.
IDAutomation.CF.PDF417Barcode.PDF417Barcode pdF417Barcode2 = new IDAutomation.CF.PDF417Barcode.PDF417Barcode();
this.Controls.Add(pdF417Barcode2);
Adjusting properties of the component
After inserting the control in the application, the properties of the control may be changed. To do this, change the properties with program code or right-click on the control and choose Properties if it is installed on a form.
Sizing the control:
The control cannot be sized manually because it must meet specific requirements, such as a precise X dimension (narrow bar width) and barcode height specified in the properties of the control. To increase the width, increase the XDimensionCM or XDimensionMILS property. To increase the height, increase the BarHeightCM property.
Parameters and methods:
NOTE: Many of the barcode sizing parameters are calculated in cm (centimeters). Some barcode measurements are determined in "mils", which are 1/1000 of an inch. Use the following rules for assistance with conversions:
To
convert mils to cm, multiply mils value by .00254. For example, 12 mils *
.00254 = .03 cm.
To convert cm to mils, divide the cm value by 2.54. For example, .03
cm / 2.54 = 11.8 mils.
To convert inches to cm, multiply the value in inches by 2.54.
Linear Properties:
- DataToEncode - This is the data that is to be encoded in the barcode. If connecting the control to a control source, then the source will override this field.
- SymbologyID - This is the type of barcode to be used. The default is Code 128. For more information on barcode types, visit IDAutomation's barcoding for beginners site.
- BarHeightCM - The height of the barcode in cm. The default is 1 cm.
- LeftMarginCM - The space of the left margin in cm.
- XDimensionCM - Width in centimeters of the narrow bars. The default is 0.03 cm which is about .012" or 12 mils. This value may need to be increased if the scanner cannot read barcodes with small X dimensions. When working with a high-quality scanner, this value can be decreased to obtain a higher-density barcode.
- XDimensionMILS - The width in mils (1/1000 of an inch) of the narrow bars.
- ApplyTilde - This option is only available when the symbology is Code 128, the character set is AUTO and ApplyTilde is enabled. The default is off.
When ApplyTilde is enabled, the following options are available:- Encode an ASCII character: The format ~ddd may be used to specify the ASCII code of the character to be encoded. For example, if entering the following text in the Data field: 66~029777 it will be encoding 666GS77 Where GS is a delimiter ASCII 29 character. Other commonly used ASCII codes are ~009 for a tab and ~013 which is a return function. For encoding other functions, please refer to the ASCII chart.
- Encoding GS1-128: To encode GS1, use ASCII 202 or character Ê as the FNC1
before each AI.
For more information, please refer to the GS1 128 FAQ. - Create a Mod 10 Check digit: To create a Mod 10 check digit for xx number of characters add the following to the DataToEncode: ~mnn (where nn is a 2-digit number representing the number of characters preceding the tilde in which to base the Mod 10 calculation).
- FNC2: When necessary, the FNC2 character may be inserted into the DataToEncode string by using ASCII 197. For example; Ã…8012349091. IDAutomation's SC5USB Scanner can be programmed to hold the barcode starting with the FNC2 in memory and only transmit it to the computer after scanning a barcode containing the FNC1.
- BMPPicture - Use the BMPPicture method to obtain an image that can be sent to the clipboard.
- CaptionAbove - Text that can be placed above the barcode.
- CaptionBelow - Text that can be placed below the barcode.
- CaptionTopAlignment - The left, right, or center alignment, in the drawing area, of the text above the barcode.
- CaptionBottomAlignment - The left, right, or center alignment, in the drawing area, of the text below the barcode.
- CaptionBottomColor - The color of the font of the caption below the barcode.
- CaptionTopColor - The color of the font of the caption above the barcode.
- CaptionBottomSpace - The distance, in cm, between the human-readable text below the barcode and the caption below the barcode
- CaptionFont - The font of the caption above and below the barcode
- CaptionTopSpace - The distance, in cm, between the bottom of the caption above the barcode and the top of the barcode
- CheckCharacter - Automatically adds the check digit to the barcode. The check digit is required for all symbologies except Code 39, Industrial 2 of 5, and Codabar. When using symbologies that do not require the check digit, the check digit may be disabled.
- CheckCharacterInText - Automatically adds the check digit that is encoded in the barcode to the human-readable text that is displayed. This does not apply to Code 128.
- CodabarStartCharacter - The start character for CODABAR. Valid values are "A", "B", "C" or "D".
- CodabarStopCharacter - The stop character for CODABAR. Valid values are "A", "B", "C" or "D".
- Code128Set - The set of characters to be used in code128. Valid values are AUTO, A, B, or C. The default and recommended selection is AUTO. For more information on Code 128, review the Code 128 FAQ.
- BackColor - The background color of the barcode.
- Font - The font of the text in the barcode.
To change the font in the code, use the following syntax for VB .NET:
Barcode1.Font = New Font(New FontFamily("Arial"), 14)
To only the point size in code, use the following syntax for VB.NET:
Barcode1.Font = New Font(Barcode1.Font.FontFamily, 14) - ForeColor - The color of the foreground text and bars in the barcode.
- FitControlToBarcode - If true will automatically size the control canvas to fit the barcode at design or runtime.
- NarrowToWideRatio - This is the wide-to-narrow ratio of symbologies that only contain narrow and wide bars such as Code 39, Interleaved 2 of 5, and MSI. Usually, this value is between 2 and 3. The default value is 2.
- Resolution - The source that is used to determine the resolution the image is drawn to, which creates a more accurate barcode. The default is printer. If custom is selected, the number residing in the ResolutionCustomDPI property will determine the resolution.
- ShowText - If this value is yes or true, the human-readable text will be displayed with the barcode.
- ShowTextLocation - The human-readable text can be placed above or below the barcode. The default is below.
- TextMarginCM - The distance between the lower portion of the barcode and the text.
- TopMarginCM - The top margin in cm.
- UPCESystem - The encoding system to be used for UPC-E, valid values are 0 and 1.
PDF417 Properties:
- Read the
PDF417 FAQ for
information about this symbology.
These properties are available only in the 2D version for idautomation.cfpdf417.dll. - ApplyTilde - If set to "true", use the format ~ddd to specify the ASCII code of the character to be encoded. The default is "true". Commonly used ASCII codes are ~009 for a tab and ~013 which is a return function.
- PDFColumns - Controls the width and height by increasing the number of data columns in the PDF-417 barcode. The default is 0 and the maximum is 30. When this is left at 0, the control will automatically adjust this setting.
- PDFErrorCorrectionLevel - The Reed Solomon error correction level placed in the symbol. More error correction creates a larger symbol that can withstand more damage. Default = 0 for automatic selection.
- PDFMode - The default, (binary mode) encodes bytes of data, and text mode encodes all characters on the US keyboard plus returns and tabs. If the user is encoding only text, text mode can usually reduce the symbol size.
- PDFRows - The number of minimum rows. If this setting is left at 0 the control will automatically adjust this setting. IDAutomation recommends leaving this set to 0 because the number of rows should be automatically generated.
- XtoYRatio - The X multiple height of individual cells; default=3.
Data Matrix Properties:
- Read the
Data Matrix FAQ
for information about this symbology.
These properties are available only in the 2D version for idautomation.cfdatamatrix.dll. - EncodingMode - The encoding mode that compresses information
in the symbol; valid values are, E_ASCII, E_C40, E_TEXT, or E_BASE256
(default).
- ASCII: It is used to encode data that mainly contains ASCII characters (0-127). It encodes one alphanumeric or two numeric characters per byte.
- C40: It is used to encode data that mainly contains numeric and upper case characters. C40 encodes three alphanumeric data characters into two bytes.
- TEXT: It is used to encode data that mainly contains numeric and lowercase characters. TEXT encodes three alphanumeric data characters into two bytes.
- BASE256: It is used to encode bytes of data and 8-bit values.
- PreferredFormat (DM_FORMAT): Sets the preferred format represented by a number; valid values are from 0 (10X10) to 23 (144X144) and from 24 (8X18) to 29 (16X48); This will be automatically determined if the size of the symbol chosen is too small.
- ProcessTilde - If true ("Y") the tilde (~) will be processed.
For example, use ~d032 for a space character, ~d009 for a tab, and ~d013 to encode a return.
- ~dNNN: Represents the ASCII character encoded by the 3-digit NNN. For example, ~d065 represents the character 'A'.
- ~1: Represents the character FNC1. When FNC1 appears in the first position (or in the fifth position of the first symbol of a Structured Append), it will indicate that the data conforms to the UCC/EAN Application Identifier standard format.
Support
Free product support may be obtained by reviewing the knowledgebase articles that are documented below and by searching the resolved public forum threads. Priority phone, email, and forum support are provided up to 30 days after purchase and additional support may be obtained if the Priority Support and Upgrade Subscription is active.
Common Issues:
- Strong naming error for Compact Framework control
- Why is an extra character added to the end of a Codabar or Code 39 barcode?
- Why are the check digits of Code 128 in the human-readable form not viewable?
- After the licensed purchase, the demo watermark is still displayed in the barcode
- It is important to have the ability to test printed barcodes with a barcode scanner. If a scanner is not available for testing purposes, IDAutomation sells high-quality complete barcode scanner kits.
- This control has the unique ability to print accurate barcodes to low-resolution printers.
NOTE: At this time IDAutomation cannot troubleshoot printing problems, these should be directed to the appropriate vendor that makes the mobile printing component or contact Microsoft for support if the Windows Mobile API is being used to print.

