Native Barcode Generator for FileMaker User Manual
- Product Overview
- Integration Tutorial
- Functions and Parameters
- GS1 Encoding
- Generating HIBC and ISBT
- TLV Base64 in QR Code KSA Example
- Technical Support
- Custom Function Implementation (Linear only)
This user manual is for the native product that supports FileMaker Pro and FileMaker Go 12 & up; previous versions of FileMaker must use the 32-bit Native Generator Plug-in. Requires FileMaker Pro Advanced to embed the object within the database. Databases containing this object may only be distributed outside the licensed organization with the purchase of a Developer License.
Buy License Support Download Demo Release Log
Overview and Compatibility
This product is a set of FileMaker objects that generate barcodes natively, without any other dependencies. It returns an SVG image within a form or report. Once installed, no other components or fonts need to be installed to create barcodes; it is the complete barcode generator embedded within the database. This product generates barcodes with X Dimensions in increments of 12 MILS or .03CM. If it is necessary to gain more accuracy over the symbol size, IDAutomation recommends using a Barcode Font with the FileMaker Font Encoder.
As an additional feature, a Custom Function Implementation is also provided for Code 128, Code 39, Codabar, MSI, and ITF symbologies. The Custom Function Implementation allows barcode generation inside a text field instead of an object.
Tutorial
- Extract or decompress the files from the package. To obtain the product, download the evaluation version or order the fully functional version.
- Open the example file included in the zip file and go to Layout mode, click on the barcode object in the example and copy, then go to the layout mode of your file and paste the barcode object into
your database.
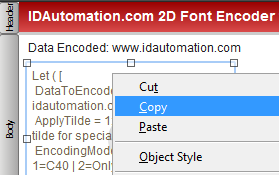
- While in Layout mode, right-click on the barcode object, select Web Viewer Setup, and make sure there is a check in front of "allow interaction with web viewer content".
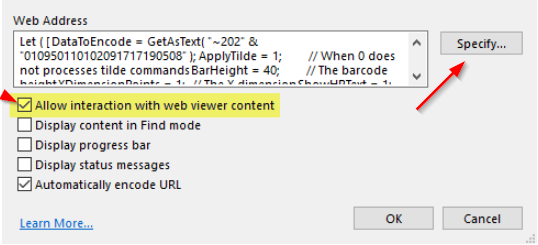
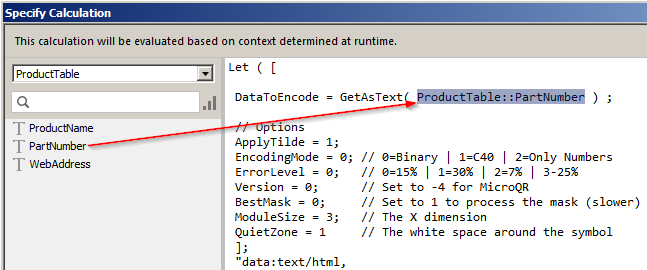
- While still in Web Viewer Setup, choose Specify or Specify Calculation. Notice that the DataToEncode line is set to the static text within quotation marks.

- Modify the DataToEncode line to equal the table and field that is to be encoded, eliminating quotation marks. This will allow dynamic information from the field
to be encoded as text within the symbol. Although GetAsText is not required, if you try to encode data from a number or date field, an error may occur without it.
- Text may also be appended or combined with quotation marks; for example, to encode "~1" before the field:
DataToEncode = GetAsText( "~1" & ProductTable::GS1Number) - Multiple fields may also be encoded in the same symbol and combined with static data; for example, the following encodes static data and two fields, placing a tab function between them:
DataToEncode = GetAsText( "TEXT" ProductTable::Field1 & "~d009" & ProductTable::Field2)
- Text may also be appended or combined with quotation marks; for example, to encode "~1" before the field:
- If necessary, parameters may be modified in the options area. Sizes such as QuietZone, XDimensionPoints, and ModuleSize are in increments of 0.03CM or 12 mils. For example, a ModuleSize of 3 would be approximately 0.1CM or 36 mils.
- Change to browse mode and verify the object updates dynamically with the data field. If it does not, verify that the table and field are accurate and remove comment characters "*/" if they were added
to the beginning and end of the code. These comment characters are sometimes added after pasting the object into a new database when a specified field does not exist.

- Change to browse mode and verify the object updates dynamically with the data field.
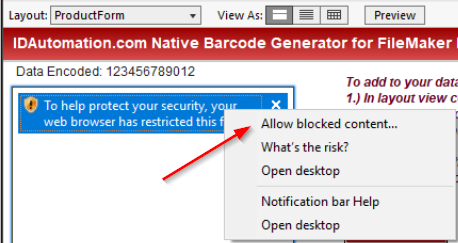
- If a security error is received restricting the view, right-click on the object and agree to the security warning by choosing "Allow Blocked Content".
- In some cases, other information on a form may be blocked out because of automatic auto-sizing. To solve this, switch to Layout mode, choose the barcode object, and choose View - Inspector or CTRL-I.
Locate the Autosizing section to disable the offending auto-sizing areas.
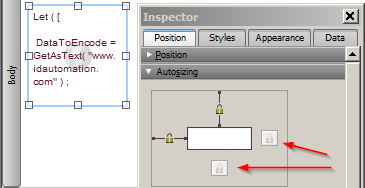
- If necessary, change parameters at the top section of the code; "1" is True, and "0" is False.
- If it is necessary to show the text interpretation below the barcode, ensure the ShowHRText option is set to "1". To automatically format and show GS1 HRI in
2D symbols, open the GS1 version of the product and paste the HRI object into the database in the same way as the barcode object. If necessary, refer to the example provided in the download.
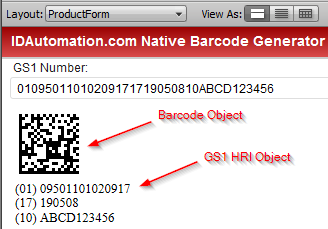
If the Human Readable text needs to be increased in size, set ShowHRText = 0 and then manually add a separate text field. This is because the human-readable text is tied to the barcode object image and can not be adjusted independently.
Functions and Parameters
DataToEncode is the only required parameter in the functions provided. Optional parameters may be changed by modifying the top section of the code as demonstrated in step 5 above.
The following is an explanation of popular parameters:
- ApplyTilde - Processes the tilde character for special functions such as encoding functions, encoding ASCII characters directly, or generating GS1-128, GS1-DataMatrix, or GS1-QRCode symbols.
- ModuleSize | XDimensionPoints - The X Dimension in increments of 0.03CM or 10 mils. For example, a ModuleSize of 3 would be approximately 0.1CM or 30 mils.
- QuietZone - White space added around the symbol in increments of 0.03CM or 10 mils.
- Font | FontSize - Valid for the HRI object only, defines the font and size.
- GS1 Encoding Options - The FNC1 may be encoded with ~202 in GS1-128 and ~1 in GS1-DataMatrix or GS1-QRCode when the tilde option is enabled. The FNC1 may also be encoded by surrounding the AI in parentheses in Code 128.
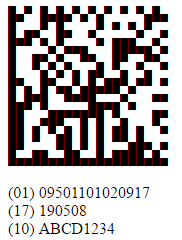
- GS1 HRI Options - When using the HRI object, multiple GS1 fixed-length element strings are automatically displayed.
Examples:
GS1-128 encoding: ~20201095011010209171719050810ABCD1234

GS1-DataMatrix encoding: ~101095011010209171719050810ABCD1234
- Tilde Options - enabling ApplyTilde or ProcessTilde will allow the following calculation options, where ?? is the number of digits before
the tilde to include in the calculation:
- ~m?? calculates a MOD10 check character, commonly used for GS1.
Example: ~2020000801234999999999~m17
Encodes: (00) 008012349999999997 - ~f?? calculates a MOD43 check character, commonly used for HIBC.
Example: +A123BJC5D6E71~f14
Encodes: +A123BJC5D6E71G - ~i?? calculates a MOD37-2 check character, commonly used for ISBT.
Example: G123412654321~i13
Encodes: G123412654321L - ~k?? calculates a MOD37-2 check character in brackets, commonly used for ISBT manual entry. This option will not encode the check character within the barcode and should only be
used in Code 128 or within the HRI object.
Example: G123412654321~k13
Encodes: G123412654321 [L] - ~CO in QR Code enables Center Override, commonly used for the Swiss QR Bill, to change the center of the symbol.
- TLV Base64 - In QR Code, when the first character is | then automatically
encode TLV values separated by | in Base64, for example:
Example: DataToEncode = "|SellerName|VNumber|DateTime|Total|VTotal" - TLV - In QR Code, when the first two characters are ^| then automatically encode TLV values separated by |
- Base64 - In QR Code, when the first character is = encode the DataToEncode in Base64 excluding the =
- ~m?? calculates a MOD10 check character, commonly used for GS1.
- Tilde ASCII Encoding - ASCII functions and characters may be directly encoded with ~??? in Code 128 and ~d??? in Data Matrix and QR Code, where ??? is a 3-digit number of the ASCII code as shown in step 4 of the tutorial.
- Symbol Verification - IDAutomation offers the Barcode Decoder App, which may be used to verify lower ASCII functions, GS1 data, and UTF-8 Unicode encoding.
Encoding ASCII Functions (such as Tabs & Returns)
In all IDAutomation products, the tilde (~) may be used to encode ASCII functions. For example, ~d009 is used to encode a tab, and ~d013 encodes a return.
Technical Support
Priority phone, email, and forum support is provided up to 30 days after purchase. Additional priority phone, email, and forum support may be obtained if the Priority Support and Upgrade Subscription is active.
Common Problems and Solutions:
- If the barcode is truncated, looks corrupted, or does not appear completely, resize or increase the width or height of the barcode object.
- If scanning problems are encountered with small barcode sizes, verify that a printer of 300 DPI or greater is being used. An X dimension of 16 MILS or greater should be used with low-resolution
thermal 203 DPI printers. IDAutomation also offers many barcode fonts that print well to low-resolution thermal printers. Additionally,
verify that the scanner being used can read small barcodes.
- If barcodes do not scan at the default settings, check to make sure that the barcode type is enabled in the scanner and that there is sufficient white space surrounding the barcode. Additional
solutions are provided in the Barcode will not scan KB article.
- Additional problems and solutions are provided by searching resolved public FileMaker forum threads.
Popular Forum Post Resolutions:
- Difference between Native Barcode Generators & Barcode Fonts
- How to Change the Height of the Barcode
- White Horizontal Lines in Barcode
- Using the Native Generator with FileMaker Server

