Barcode Generator for Google Sheets | Docs User Manual
Buy License Support Download Demo Release Log
Product Overview
This Barcode Generator is a Google Apps Script intended for Google Sheets users who wish to easily integrate native barcode generation capability without any external dependencies. It may also be used in any Google Apps with a similar implementation. This product is implemented as a single script module that returns a Unicode Image to create a barcode out of pure text. Complete source code is provided with all developer licenses which allows the developer greater flexibility with implementation and design. Once imported into a Sheet, no other components or fonts need to be installed to create barcodes; it is the complete barcode generator that stays embedded in the spreadsheet. Supports 1D Code 128, 39, ITF, 2D QR-Code, Data Matrix, and PDF417 are supported. Also supports GS1 in Code 128, Data Matrix, and QR-Code. The script files provided are compressed so they load and run faster. Uncompressed source code is provided with all Developer Licenses.
Integration Tutorial for Google Sheets
This tutorial uses Code 128 from the linear package as an example. If problems are encountered with this tutorial, IDAutomation recommends referring to the sample in the demo package. The demo version of this product will only produce a static barcode that can not be changed.
- Extract the files from the package download.
- Open the appropriate file ending in .txt. This is the compressed version of the Google Script code in a text file.
- Select all and copy the script code in the file to the clipboard.
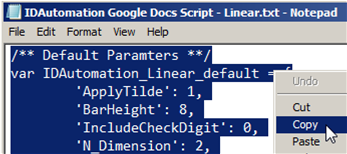
- Open the Google Sheet.
- Choose Extensions > Apps Script and paste the script code into the script editor.

- Functions that generate the barcode are listed at the top of the script
file. Select the appropriate function and copy it to the clipboard.
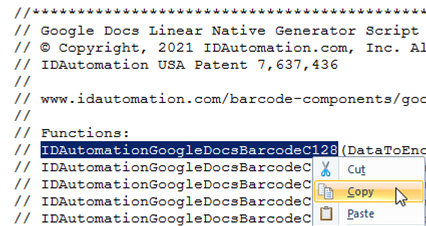
- Save and close the script.
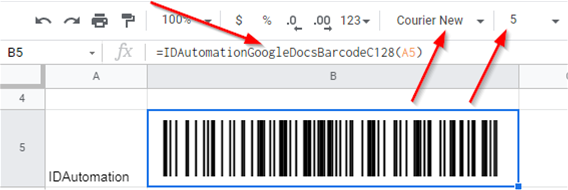
- In the cell where the barcode is needed, type the equal sign and then paste the barcode function, and enter the cell in the parentheses that will be the source text for the barcode.
- Change the font to "Courier New" and type "5" into the font size box to
change the point size to 5 points. The smaller the point size, the smaller the
barcode will be. Some point sizes will look distorted on the screen, although
they will be accurate when printed. Choose a size that does not look distorted.
If a particular X dimension is needed, use the chart below to enter the correct
point size.
Point Size X Notes about point size and symbol distortion 2 08 Mils (.02cm) - To scan from
the screen of a Windows PC, the best sizes to use are usually
5, 10, 12, or 16 points.
- If distortion is noticed, slightly adjust the point size up or down until a correct symbol is obtained.
- The X dimensions are doubled for 2D matrix symbols such as Data Matrix and QR-Code. For example, a QR-Code printed at 5 points will have an X of 40 Mils.
- The X dimensions are approximate and may change with different resolutions of printers and screens.
- When using a 203 or 300 dpi thermal printer the point size should be 5 points. To better support low-resolution printers, download the Universal 2D Font and install the “IDAutomation2D S” font from the package. After installation, select the “IDAutomation2D S” font instead of Courier New or Consolas to generate the symbols. When using the IDAutomation2D S font, refer to the Specifications to determine the point size.
3 12 Mils (.03cm) 4 16 Mils (.04cm) 5 20 Mils (.05cm) 6 24 Mils (.06cm) 7 28 Mils (.07cm) 8 32 Mils (.08cm) 9 36 Mils (.09cm) - To scan from
the screen of a Windows PC, the best sizes to use are usually
5, 10, 12, or 16 points.
- Press enter and a barcode will appear.
- To create barcodes in additional columns, move the mouse to the bottom right of the cell and the arrow should turn into a plus sign (+); left-click and drag down to the end of the column.
- Once the left button is released the functions should calculate and multiple
barcodes will appear.

- To change options of the barcode, such as bar height, go into the script editor and locate the default options area at the top of the script. Optionally, the options may also be changed in the function.
Docs Static Barcodes
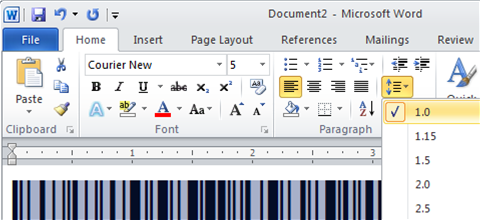
The barcode result in Sheets may be easily copied and pasted into another app, such as Google Docs or Word. This is referred to as a static barcode because the barcode does not change with data as a dynamic barcode would.- Copy the cell containing the barcode to the clipboard and paste it into Docs. Within Docs, select the entire pasted symbol and make sure the font is set to Courier New at 5 points, or another appropriate point size according to step 9 above.

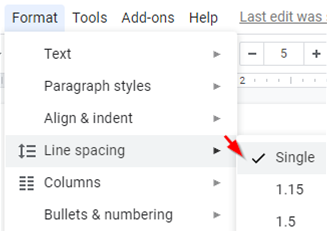
- Select the entire pasted symbol and change the line spacing to 1 or single. This should remove excess white space between the lines in the symbol.
Docs Mail Merge
This product may be used to generate dynamic barcodes in a Google Docs mail merge when Sheets is used as the data source. This implementation should only be performed by advanced users and is not directly supported by IDAutomation, because Docs does not contain user-friendly mail merge functionality as Microsoft Word does. This implementation would be as follows:- Set up the template and sheet according to the Google Docs API or a similar implementation.
- In the area of the document template that will contain the merge field for the barcode, make sure the font is set to Courier New at 5 points, or another appropriate point size according to step 9 above.
- Select the merge field and set the line spacing to 1 or single. This should remove any white lines within the barcode.

- After the merge is complete the barcodes should populate from the appropriate column in the Sheet.
- To gain more control over where the barcode appears in the template, consider placing it centered in a table as shown in the image below. The border of the table may be changed to white to keep it from appearing.

Creating GS1 Symbols | Tilde Options
IDAutomation includes the capability in this product to create barcodes for GS1-128, GS1-DataMatrix, and GS1-QRCode with the Apply Tilde feature enabled.
Code 128: (in IDAutomationGoogleDocsBarcodeC128)
~202 encodes the FNC1, necessary to create GS1 symbols.
~m?? calculates a MOD10 check character from ?? number of digits.
~??? encodes ASCII functions and characters. For example, ~009 encodes the tab function.
Data Matrix and QR Code:
~1 encodes the FNC1.
~m?? calculates a MOD10 check character.
~d??? encodes ASCII functions and characters.
QR Code Specific:
~CO?? enables Center Override in QR Code, commonly used for the Swiss Cross on the QR Bill for digital payment transactions.
TLV Base64 - In QR Code, when the first character is | then automatically encode TLV values separated by | in Base64, for example:
Example: DataToEncode = "|SellerName|VNumber|DateTime|Total|VTotal"
TLV - In QR Code, when the first two characters are ^| then automatically encode TLV values separated by |
Base64 - In QR Code, when the first character is = encode the DataToEncode in Base64 excluding the =
Functions of the Google Docs Barcode Generator
The following functions are available:
- DataToEncode - This string value represents the data being encoded.
- N_Dimension - Determines the width of the wide bars, which is a multiple of the X dimension. Valid values are 2 and 3. The default is 2.
- IncludeCheckDigit - A Boolean value that determines whether a check digit should be automatically calculated and included for the DataToEncode.
- BarHeight - The height of the bars in the
symbol; default = 8, which is about .3 inches or 1 CM. The approximate height
is determined with the following formula:
Height in Inches = (Font Size) * (BarHeight) * 0.015
Height in CM = (Font Size) * (BarHeight) * 0.04
| 1D | Barcode Functions |
| Code-128 Auto | IDAutomationGoogleDocsBarcodeC128(DataToEncode, ApplyTilde, BarHeight) |
| Code 128 A | IDAutomationGoogleDocsBarcodeC128a(DataToEncode, BarHeight) |
| Code 128 B | IDAutomationGoogleDocsBarcodeC128b(DataToEncode, BarHeight) |
| Code 128 C | IDAutomationGoogleDocsBarcodeC128c(DataToEncode, BarHeight) |
| Code-39 | IDAutomationGoogleDocsBarcodeC39(DataToEncode, IncludeCheckDigit, N_Dimension, BarHeight) |
| Codabar | IDAutomationGoogleDocsBarcodeCodabar(DataToEncode, N_Dimension, StartChar, StopChar, BarHeight) |
| Interleaved 2-of-5 | IDAutomationGoogleDocsBarcodeI2of5(DataToEncode, IncludeCheckDigit, N_Dimension, BarHeight) |
| MSI | IDAutomationGoogleDocsBarcodeMSI(DataToEncode, IncludeCheckDigit, N_Dimension, BarHeight) |
| 2D | Barcode Functions |
| Data Matrix & GS1 DataMatrix |
IDAutomationGoogleDocsBarcodeDataMatrix(DataToEncode, ApplyTilde, EncodingMode, PreferredFormat, QuietZone) |
| PDF417 | IDAutomationGoogleDocsBarcodePDF417(DataToEncode, ApplyTilde, EccLevel, ColumnSpecify, RowSpecify, Truncate, ForceBinary, XYRatio) |
| QR Code & GS1 QR Code |
IDAutomationGoogleDocsBarcodeQRCode(DataToEncode, ApplyTilde, EncMode, ErrLevel, Version, BestMask, QuietZone) |
Technical Support & Troubleshooting
Additional solutions may be searched for in the public Google Sheets forum threads. Priority phone, email, and forum support are provided up to 30 days after purchase. Additional priority phone, email, and forum support may be obtained if the Priority Support and Upgrade Subscription is active.
Common Problems and Solutions:
- Barcode shows Loading... instead of the symbol: As a temporary workaround choose refresh on your browser if the barcode does not show. This is a known issue tracked by Google; refer to Google Apps Script Custom Functions Stuck in Loading.
- Barcodes do not appear correctly in the spreadsheet: Certain
browsers may not display the barcode correctly. Firefox for example may produce
barcodes with small gaps.
 Try updating the browser to the latest version. This is a browser limitation, or the browser's inability to properly
represent line spaces. When a PDF is generated or the spreadsheet is printed,
the barcodes will be produced correctly.

- Barcodes appear jumbled: if the spreadsheet is closed and reopened
within five minutes the barcodes may appear jumbled; this occurs because they
need to be recalculated. Forcing the functions to recalculate will also display
the barcodes correctly. This can be done by selecting the cells containing the
barcodes and changing the formatting in the "More Formats" drop-down list. For
example, if Plain Text is the current format, select Normal. This should update
the cells and the barcodes should appear normally.
 This
issue may also appear in the 2010 version of the product because of a later
requirement of how returns are handled. To fix this version, locate and change
the following line of code:
BarcodeImage = BarcodeImage + PrintableString + String.fromCharCode(13);
And change it to:
BarcodeImage = BarcodeImage + PrintableString + String.fromCharCode(13)+ String.fromCharCode(10);

- Barcodes are wrapping: After the function is entered if the cell is not wide enough the barcode may not appear as expected. Increase the width
of the column to correct this issue.


