Native Barcode Generator for Oracle Reports Manual
- Product Overview
- Tutorial
- Support
- If a scanner is needed to verify barcodes, IDAutomation also offers barcode scanners.
Buy License Support Download Demo Release Log
Product Overview & Compatibility
The Native Barcode Generator is a product intended for Oracle Developers who wish to easily integrate barcode capability into their databases and applications without any external dependencies. This product is implemented as a PLL file, which allows the developer much flexibility in implementation and design, without any annoying add-in menus or license file requirements. Once installed in a database, no other components or fonts need to be installed to create barcodes.
| Compatibility and Requirements | |
| Application Compatibility | Oracle 9i and above |
| Symbology Compatibility | Code-128, GS1-128, Code-39, Codabar, Interleaved 2-of-5, ITF, POSTNET & PLANET |
| Minimum System Requirements | 500 MHZ Processor, 128MB RAM, 5 MB Available hard drive space |
| Intended Implementer | Oracle Developers |
* This package does not support UPCA, UPCE, EAN13, or EAN8 barcodes because of the required OCR text characters that must appear below this barcode type. If these barcode symbologies are required, the UPC/EAN Barcode Font Package is available as a separate purchase and may be used with the Font Encoder PLL.
Barcode Integration Tutorial
The installation of the Native Barcode Generator on Oracle Reports is a three-step process. If problems are encountered with this tutorial, IDAutomation recommends referring to the sample report IDAutomationSample.jsp included in the package.
Step 1 - Character Set Setup for American_America.UTF8
- The Native PLL uses Unicode characters to create the barcode. In order to correctly display the barcode, a character set within the Environment Variables must be set to UTF8.
- Unix and Linux users:
- Set the NLS_LNG 3rd field, use the command % setenv NLS_LANG American_America.UTF8. In Linux, use the command $ export LC_ALL=UTF-8.
- Windows users:
- Right-click My Computer and select Properties.
- Select the Advanced tab and then Environment Variables.
- In the System Variables section, create a new variable.
- Set the Variable name to NLS_LANG and the Variable value to American_America.UTF8.
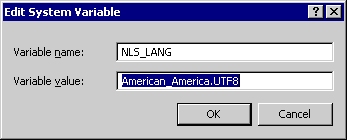
Step 2 - Oracle Reports Barcode PLL Library Installation
- This PLL library is compatible with any version of Oracle Reports that supports the attached libraries. It was developed and tested against Reports 9i. If used in the database itself, the version of the database would be any version that supports PL/SQL. If needed, the PL/SQL source code may also be provided with the purchase of an Unlimited Developer License.
- Open Oracle Reports Builder.
- Open the report rdf file that will contain the barcodes.
- Select the attached libraries option.
- Press the create button (green plus symbol) on the left toolbar.
- In the dialog box, select the File System radio button, and click on the Browse button.
- Select the IDAutomation_Linear_Native.pll file from the operating system.
- Press the Attach Button.
- A dialog box will appear asking to remove the path. If "Yes" is selected, the PL/SQL library will need to be reattached to the report every time the report is opened. If "No" is selected, it will always look for the path in the same location. It is preferable to leave the library in the same directory as the report.
- The functions in the library are now ready to be used in the report.
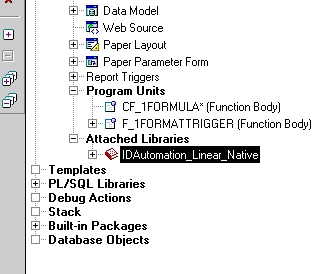
- Once the library is attached, the Object Navigator should look similar
to the following under Attached Libraries:
Step 3 - Oracle Reports Formula Setup
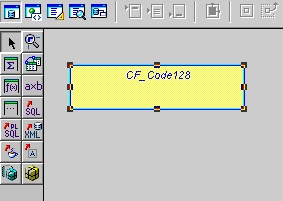
- Add a Formula Column to the report by using the Data Model option
of the Report Layout, clicking the Formula Column button on the toolbar,
and sizing the column in the layout area so it is large enough to contain
the entire barcode.
- The properties of the newly added Formula Column need to be adjusted
to call the PL/SQL function from the IDAutomation_Linear_Native.pll
library. Access the property page for the Formula Column by selecting
the Formula Column and pressing the F4 key. The following window will
appear:
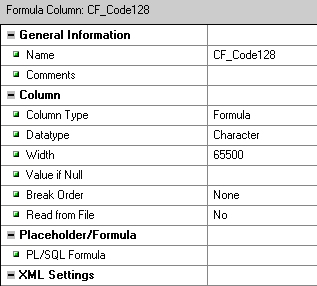
- Adjust the following properties:
- Name -- Choose a descriptive name for the Formula Column because the columns will need to be referenced when designing the layout of the actual report.
- Datatype -- This must be selected as "Character" from the drop-down menu.
- Width -- Enter 65500 as the width of the field or the maximum number allowed. This large width is needed to hold the many characters that may be returned to generate the barcode.
- Click on the PL/SQL Formula button within the Property Inspector
to call the appropriate IDAutomation.com function.
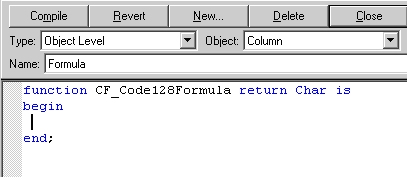
- At the cursor, insert the appropriate IDAutomation.com PL/SQL function call. This function will generate the barcode in a Unicode text string.
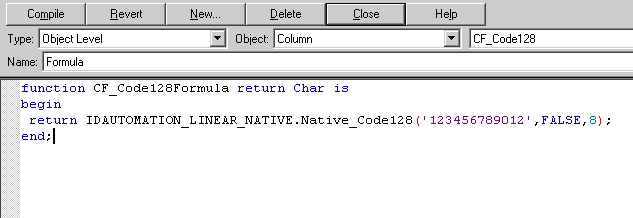
- In the above example, a constant value (123456789012) was passed into the function, whereas an appropriate text field may be substituted from the database in a production environment.
- Click Close in the above window and ensure the report has been saved.
- To add this Formula Column to the report, switch to Paper Layout
mode for the report and add a Field object to the report by clicking
the appropriate item in the toolbar and dragging it into position on the
report.
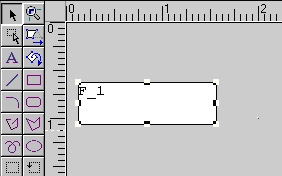
- Once the Field has been added to the report, it needs to be linked to the Formula Column that was created earlier. To link the Field to the Formula Column, select the field and hit the F4 button to bring up the Property Inspector for the Field. The Property Inspector should
look similar to the following:
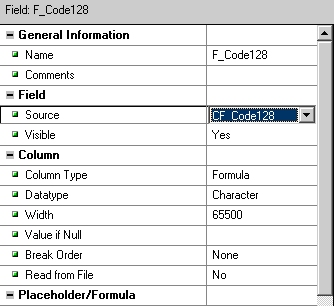
- Adjust the following properties:
- required Source -- Select the name of the Formula Column that was created earlier.
- required Width -- Verify the width is 65500 or greater.
- optional Name -- Choose a descriptive name for the field.
- Set the font to Courier New or another
Unicode mono-spaced font at 3 points, or another size according
to the chart below. If the font selected is not a mono-spaced font,
the barcode created will not be correct and will not scan, even though
it may look correct.
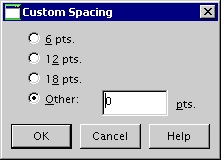
Point Size Approximate X Dimension 2 08 Mils 3 12 Mils 4 16 Mils 5 20 Mils 6 24 Mils 7 28 Mils 8 32 Mils - Select Format - Text spacing - Custom
- Other and set the line spacing to 0. This setting is necessary to
eliminate white horizontal lines that may appear in the symbol.
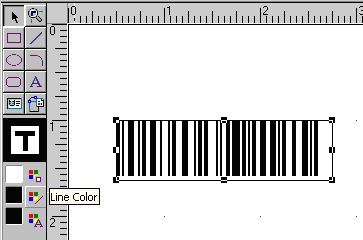
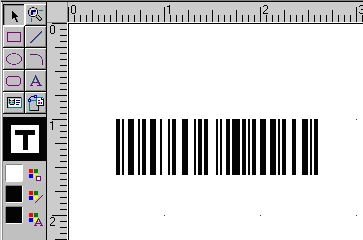
- Remove the border surrounding the barcode by setting the Line Color
on the left panel to the background color of the layout, which should
be white.
- If it is desired to have a text interpretation appear below the barcode, add the appropriate formula column to the report just below the symbol.
- To compile the report, click on Program, Compile, All.
- Click on the Paper Design toolbar to run the report.
- Print and scan the barcode to ensure the correct data is encoded. If a scanner is needed to verify barcodes, IDAutomation offers several hand-held scanner kits.
Functions of the Native Barcode Generator
The result line in Step 5 of the Oracle Reports Formula Setup tutorial above may be changed to create various barcode types, which are abbreviated below. For example, to create a Code 128 Auto barcode, the result line on step 5 may look similar to this:
return IDAutomation_Linear_Native.Native_Code128('123456789012', FALSE, 8) ;
The following symbology options and functions are available:
- DataToEncode - This is a text string value that represents the data being encoded.
- N_Dimension - Determines the width of the wide bars, which is a multiple of the X dimension. Valid values are 2 and 3. The default is 2.
- IncludeCheckDigit - A Boolean value that determines whether a check digit should be automatically calculated and included for the DataToEncode, represented by True or False.
- StartChar - This is the start character for the Codabar symbology. The letters A, B, C, and D are used for start codes.
- StopChar - This is the stop character for the Codabar symbology. The letters A, B, C, and D are used for stop codes.
- BarHeight - This is the height of the barcode. Set the height to 8 for the default setting.
- ApplyTilde - In Code 128 AUTO, if the ApplyTilde option is set to True, the tilde will be processed and allow several encoding options.
| Barcode Functions (used in the result line of Step 5) | |
| Symbology | Function |
| Code128 | Native_Code128 (DataToEncode, ApplyTilde, BarHeight) |
| Code128A | Native_Code128A(DataToEncode, BarHeight) |
| Code128B | Native_Code128B(DataToEncode, BarHeight) |
| Code128C | Native_Code128C(DataToEncode, BarHeight) |
| Code39 | Native_Code39(DataToEncode, IncludeCheckDigit, N_Dimension, BarHeight) |
| Codabar | Native_Codabar( DataToEncode, StartChar, StopChar, N_Dimension, BarHeight) |
| Interleaved 2 of 5 | Native_I2of5(DataToEncode, IncludeCheckDigit, N_Dimension, BarHeight) |
| Postnet | Native_Postnet(DataToEncode, IncludeCheckDigit) |
| Planet | Native_Planet(DataToEncode, IncludeCheckDigit) |
Technical Support
Priority phone, email, and forum support is provided up to 30 days after purchase; If the Priority Support and Upgrade Subscription is active, additional priority phone, email, and forum support may be provided.
Common Problems and Solutions:
- Barcode does not Scan:
- Ensure the font of the text box the barcode appears in is set to Courier New.
- Make sure there is sufficient white space surrounding the barcode.
- Check to make sure that the barcode type is enabled in the scanner.
- Ensure the scanner being used is able to read barcodes of the same size from other sources.
- If printing small barcodes, verify a printer of 300 DPI or greater is being used. An X dimension of 16 MILS and a point size of 4 or greater should be used with all low-resolution thermal printers. IDAutomation also offers barcode fonts that print well to low-resolution thermal printers.
- Additional solutions for this issue are provided in the Barcode will not scan KB article.
- Barcode is distorted:
- If white horizontal lines appear in the symbol; adjust the text spacing.
- Decrease the point size of the font or size of the field so it is large enough to contain the generated symbol.
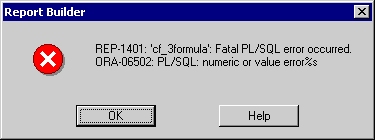
- REP-1401 ORA-06502: PL/SQL: numeric or value errors:
- This message may appear if the width within the Formula Column
is not large enough. Verify the width is 65,000 or greater.
- This message may appear if the width within the Formula Column
is not large enough. Verify the width is 65,000 or greater.
Additional problems and solutions are provided by searching resolved public forum threads.

