MICR Check Printing Design Software User Guide
IDAutomation Check Printing and Design Software allows users to easily design, create, and print bank checks onto blank or pre-designed check stock. This product is free to use when purchasing the MICR E-13B Font Advantage Package.
Buy License
Support
Download Demo
Release Log
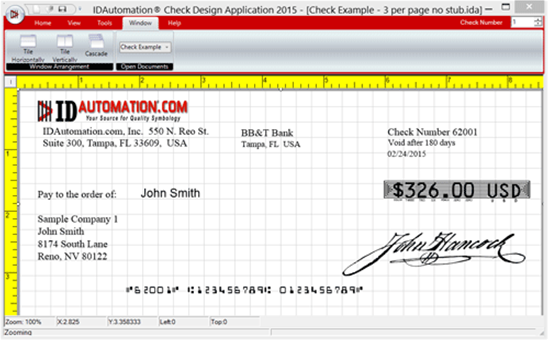
User Guide Index:
- Installation
- MICR Bank Check Creation and Design
- Adding Signature Images
- Create Incrementally-Numbered Check Label Fields
- Link to an External Data Source or Database
- Create an Embedded Data Set
- Adjust MICR or Text Object Properties
- IDAutomation MICR Font Package
- MICR Toner, Check Stock and Supplies
- Support
Check Printing Design Software Installation
This Bank Check Printing Design Software is compatible with Windows 7 and above.
- Purchase and install the required MICR E-13B Font Package or download the MICR demo first for testing.
- Download the Check Design Application and open the file named IDAutomation_MICR_Check_Design_Application.exe.
- If it is desired to have the software generate MICR without a font installed, the IDAutomation Label Software Pro version should be used. It can print MICR from a component without requiring the installation of fonts.
Bank Check Creation and Design
Referred to as "labels" in the software, bank checks can be created to include MICR characters, text, and graphics. Labels, such as templates, may also be saved and retrieved for later use. Sample
label files are provided in the software download and can be accessed from:
Start - Programs - IDAutomation MICR Check Design Application - Check Examples.
- After the application is installed, open the software from the appropriate program group or icon and select Create New Check.
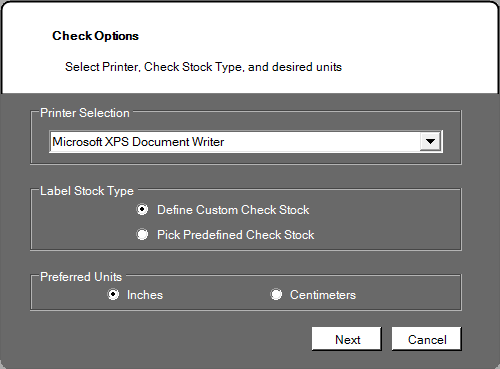
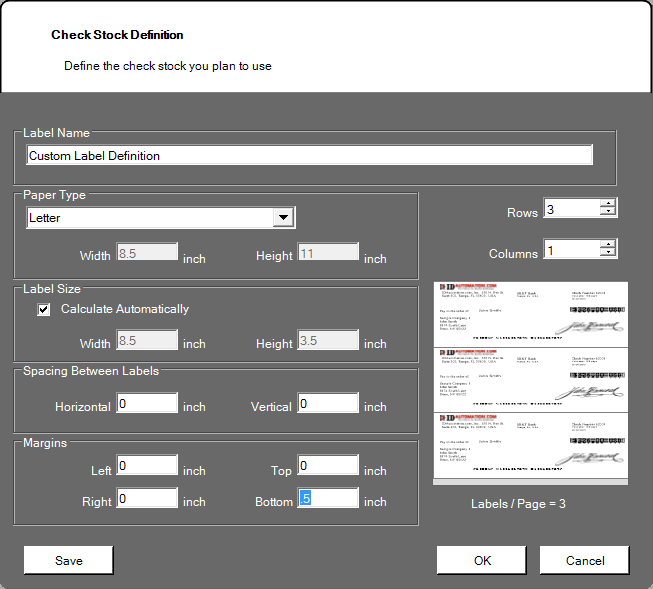
- In the Check Options screen, choose the printer where the checks will be printed, the check stock type, and the preferred unit of measurement. Two predefined check stock types are available:
3 per page business size, with or without a .5" perforation at the bottom. If these predefined labels are not compatible with the selected printer or if another type of check stock is required, select
the Define Custom Check Stock option and click Next.
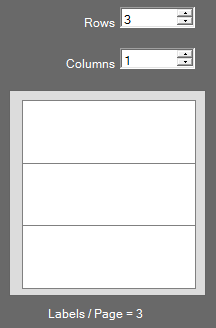
- The following screen allows for the automatic calculation of each label's size. Most check stock is 3 checks per page, which is 3 rows and 1 column. If there is a perforation on the bottom of the check
stock, enter a bottom margin of .5 inches. Select the number of rows and columns of the label sheet and click OK.
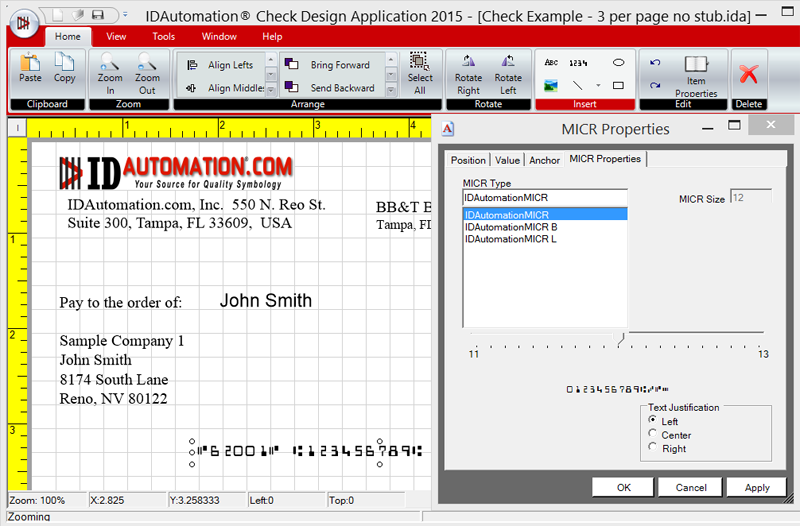
- On the next screen, click the appropriate toolbar icon to add text, MICR, and graphic objects into the white design area. A gray border in the design area indicates an area where the selected printer
is not able to print.

- Any object property may be modified by right-clicking the object and selecting properties.
- From the properties window of the MICR object, select the Value tab. This determines the value-to-encode in the MICR line. The best method of creating the MICR line is with a VB script formula.
The formula will need to assemble the MICR line according to the associated characters:

For example, the following formula value creates a MICR line for a preprinted business-size bank check:
"C" & LabelField(SerialNumber) & "C A763591681A 0710527197C"
When the serial number check field is set to 621001, the following result is produced for check number one:

- Select Start - Programs - IDAutomation MICR Font Advantage - MICR Setup - Calibration Tool. Print one page with the printer, toner, and check stock that will be used to print bank checks to verify proper MICR calibration. If calibration is necessary, select the appropriately sized font in the MICR Properties tab. Alternatively, the point size of the font may also be increased
or decreased instead of calibration.
- In the bank check design process, it is highly recommended that security fonts be used for the amount field with a formula in a text object.
When these are used, it is no longer necessary to print the written check amounts.
For example, the formula "[" & Currency(Field(9),2) & "_USD]" converts field 9 of a data source to the format necessary for the security fonts.

Security fonts are included with the IDAutomation MICR Font Advantage license.

- Additional resources are available to assist in designing MICR checks such as the official ANSI X9.100 document. When the check design is complete, select the Print or Print Preview icon.
- Confirm the print range and select Print. Consider first printing only a few checks to verify that the printer is correctly aligned. If the checks do not print accurately, select Application
Button - Check Layout and confirm that all margins are set to 0. If there is a perforation on the bottom of the check stock, enter a bottom margin, which is the size of the perforation, usually .5
inches.
Adding Signature Images
 Signature
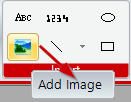
images may be added to a check design by selecting the Add Image icon. If there is no authorized signature image, one may be created by scanning the signature on a document, or by taking a clear
picture of the image with a camera. After the image is saved to the computer, crop the signature portion out of the image and save it as a separate file. Windows provides a snipping tool that makes this
process very simple. The signature image should have a completely white or transparent background.
Creating Incrementally-Numbered Check Label Fields
Label fields may be used to track check numbers or simplify updates when multiple objects on a check use the same information. For example, a text object and a MICR object may contain the same serial number field that keeps track of the check number.
Label Fields may be constant values or incrementing numbers, the latter of which keeps track of numbers that have been printed in previous print jobs so that each check is associated with a unique number. When the check is next opened for printing, the serial number fields begin incrementing at the next unused number.
Steps to Set up Label Fields:
- With the check label open, select Edit - Properties in Classic Mode or select Item Properties off the Home Tab in Advanced Mode.
- Select the Label Fields tab.
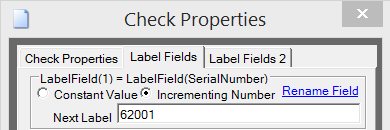
- Select Constant Value or Incrementing Number and enter any necessary values or numbers. Choose the Rename Field option to create a friendly name for the field.
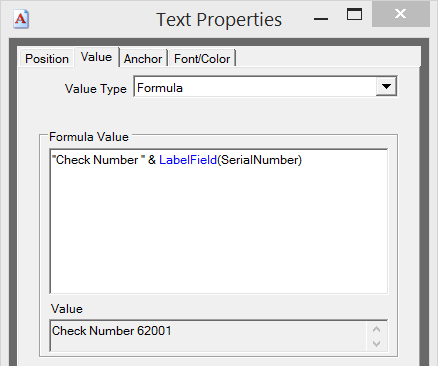
- After the fields are created and applied, they may be used in the Value tab with a VB Script formula.
- If resetting SerialNumber fields to a different value, open the Label Fields tab and set the value.
Link to an External Data Source or Database
The Check Design Printing software can link to columns in Microsoft Access, Excel, or a CSV text file as a data source for a text or MICR object. This allows the printing of labels from data that exists in Excel and Access, or a file export from other applications. Perform the following to link to an external data source:
- Select Tools - Data Sets - Link - External Data.
- Choose the external data type and then Search to find the file.
- After the source path is located, choose the appropriate source sheet if applicable.
- Select Embed Data to see a snippet of the linked data.
- After the data is linked, select Close.
- To link an entire column of data to a MICR or text object, click the down arrow next to Value Type and select External DataSource, then click the source column
to link the value. The example window will display what is linked.
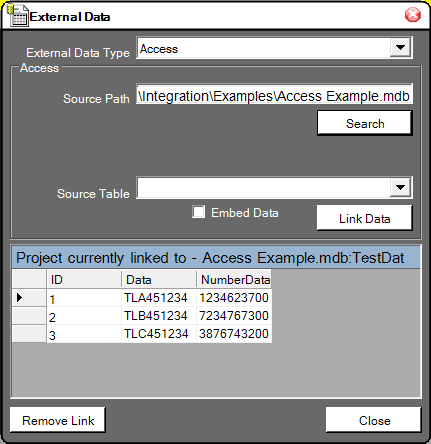
- Increment the Label Number in the design screen to verify the data is linked.
- When printing, consider selecting all rows data source as the option, but only after printing a single page to verify accurate alignment.
- When linking to CSV or text files, the format should be as follows:
"Column1","Column2","Column3"
Create an Embedded DataSet
IDAutomation Check Design and Printing Software allows a user to create a database, which is embedded in the label data file itself. This allows data entry of several different custom values to be created on labels.
- Select Tools - Data Sets - Create Embedded DataSet.
- By default, three columns are created. Use the buttons at the bottom of the window to add, remove, or export the data.
- Choose the OK button at the bottom of the window when finished.
- To link an object to the data entered, right-click on the barcode, select Properties, choose the Value tab, and select External Data Source as the value type.
Adjusting MICR or Text Object Properties
Properties of MICR or text objects may be adjusted by right-clicking on the object and selecting Properties. Below is a list of the properties and their functions in each tab.
NOTE: The Barcode Label Pro version includes additional VB script formulas in addition to barcode capability and a MICR component that does not rely on the MICR font to be installed.
- Position allows the user to manually place the object in the design area and change the orientation.
- Value is the data that is encoded in the object.
- When using the MICR object, be sure to format the data correctly. For example, the following formula value creates a MICR line:
"C" & LabelField(SerialNumber) & "C A123456789A 0123456789C"
which produces the following result for label number 1:

- The global append values will append the prefix or suffix to the value. For example, an incremented value of 101 and a prefix of TX will create TX101 on label 1 and TX102 on label 2.
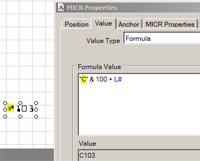 The formula value creates the result from the Visual
Basic syntax formula entered. For example, the formula of "C" & 100 + L# will create C101 on Check 1, C102 on Check 2, C103 on Check 3, where "C" is a reserved
character as designated:
- The following is a list of what is supported:
- Operators:
/ divide
* multiply
& concatenate words
- subtract
+ add
VBCRLF adds a new line - Variables:
L# label number
T# total number of labels. Example: "This is label " & L# & " of " & T# produces This is label 2 of 5.
Date() returns the current date; for example 11/18/2010
LabelField(name) returns the value of the Label Field variable. Example: LabelField(ChkNum) - Date Macros:
- Date() returns the current date, 11/18/2010
- Time() returns the current time, 2:16 PM
- Year() returns the current year, 2010
- Month() returns the current month, 11
- MonthName() returns the current month name, November
- Day() returns the current day, 18
- DayName() returns the current day name, Thursday.
- External Data:
- Field(col) returns the value in the linked data source for the column [col] of the current row. Example: Field(1)
- FieldName(name) - returns the value in the linked data source for the column according to the current row.
- Operators:
- The following is a list of what is supported:
- When using the MICR object, be sure to format the data correctly. For example, the following formula value creates a MICR line:
- MICR Type allows the selection of the MICR font and fine adjustment of the point size.
Support
IDAutomation provides a variety of methods for customers who need support for the Bank Check Design and Printing Software:
- Troubleshooting MICR Font and Component Issues
- Order MICR Toner and Check Stock
- General Barcode Font Support Issues
- Contact Technical Support
Popular Forum Post Resolutions:
- InvalidOperationException after installing (Disable and re-enable .NET 3.5)
- Anchors are offset from objects
- Using MICR Fonts in Crystal Reports
- How to install MICR Fonts on Windows
- MICR E13B Special Characters
- Printing issues with MICR Font
The source for the IDAutomation Check Printing and Design Software can be obtained with the purchase of the Unlimited Developer License for the MICR E-13B Font Package and a signed Source Code Agreement.

