Native Crystal Reports Barcode Generator User Manual
- Product Overview
- Download Demos
- Integration Tutorial
- Parameters & Tilde Options
- Swiss QR Bill in QR Code
- TLV BASE64 in QR Code
- Visual Studio Integration
- Support
- Product Update: QR Code now includes new built-in support for UTF8 Encoding, Auto Mode, TLV and Base64, Swiss QR-Bill, Center Override, and GS1 QR Code. Data Matrix includes a faster and more efficient auto-encoding algorithm and supports GS1 and UTF8. If you have purchased previously, activate level 2 support to obtain the latest version.
NOTE: This product supports Crystal version 9 and later. Refer to the Crystal Integration Guide for products that support earlier versions.
Buy License Support Download Demo Release Log
Reports containing this object may only be distributed outside the licensed organization with the purchase of a Developer License to the Native Barcode Generator.
Product Overview
The Native Barcode Generator functions as an object that may be easily inserted into a Crystal Report to create barcode images. The barcode images are generated using the patented Unicode Image method. Once installed in a report, no other components or fonts need to be installed to create barcodes; it is the complete barcode generator that stays with the report, even when distributed.
Barcode Integration Tutorial
Installing the Native Barcode Generator is a fairly simple process. Several generators are created for different barcode types.
- Extract the files from the Native Barcode Generator package.
- Several generators are created for different barcode types. Open the report that represents the barcode type that is needed.
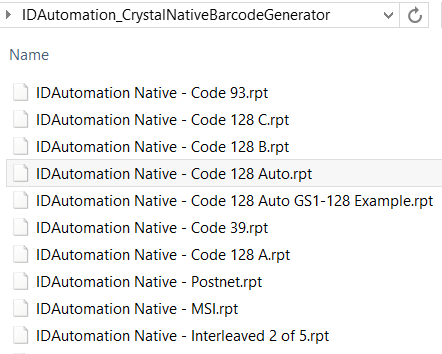
If in doubt, IDAutomation recommends choosing Code 128 Auto, which is in the file named IDAutomation Native - Code 128 Auto.rpt. - Choose View - Design to switch to design mode and locate the Native
Barcode Generator object within the details section of the report.
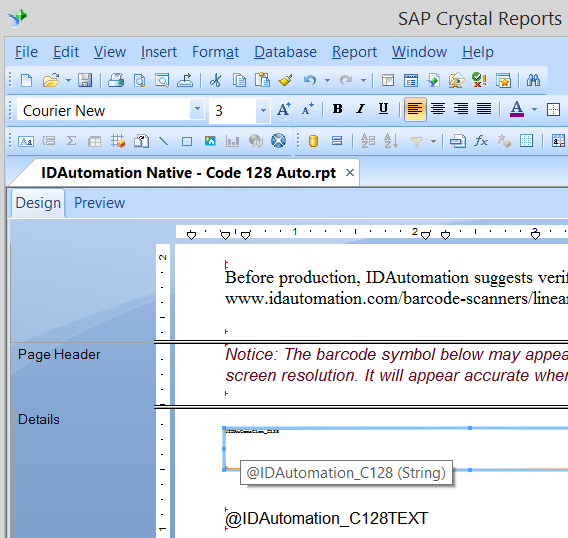
The object is the field in the details area that contains very small text. - Highlight the Native Barcode Generator object and choose Edit - Copy
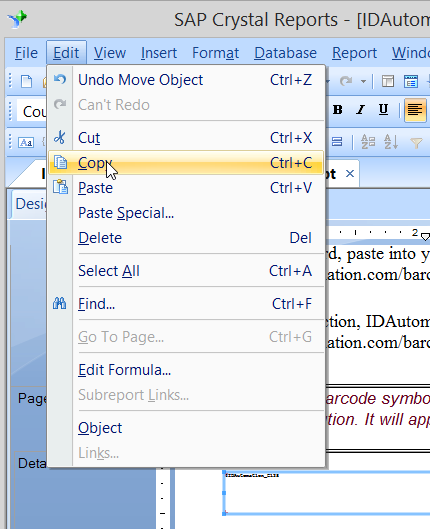
or Right-Click on the object and select Copy.

- Open the report the barcode is needed for and choose Edit - Paste
to paste the Native Barcode Generator object where it is desired.
- When creating GS1 symbols, the text object related to the Barcode Generator
object should also be copied, if it is desired to have the text interpretation
appear.
- When creating GS1 symbols, the text object related to the Barcode Generator
object should also be copied, if it is desired to have the text interpretation
appear.
- Highlight the object and choose Edit - Edit Formula.
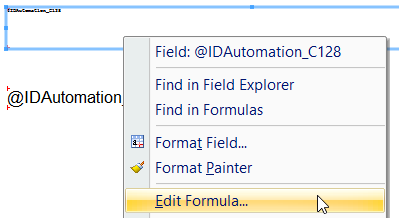
- If more than one barcode will be on the same report it is necessary to rename the formula. In the formula workshop right click on the formula name and choose rename. Add a descriptive name to the end, for example, IDAutomation_C128_CustomerData.
- Modify the "DataToEncode
=" line of the formula to equal the data that is to be encoded in the
barcode.
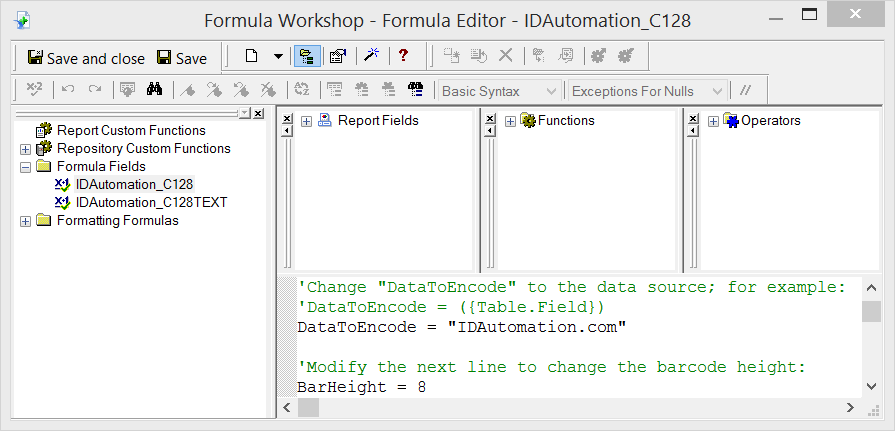
If an error such as "A string is required" appears, the data will need to be converted to a string with a crystal function. For example: DataToEncode = cStr( {Table1_.FloatValueField},0 ) - Optionally, parameters below the "DataToEncode
=" line of the formula may be changed as necessary.
- For linear barcodes only, when changing the "BarHeight
=" variable, the size of the object must also be increased so that taller
barcodes may be contained. The approximate height is determined by the following
formula:
Height in Inches = (Font Size) * (BarHeight) * 0.015
Height in CM = (Font Size) * (BarHeight) * 0.04
For example, the default BarHeight of 8 equals about 0.3 inches and 1 centimeter.
- For linear barcodes only, when changing the "BarHeight
=" variable, the size of the object must also be increased so that taller
barcodes may be contained. The approximate height is determined by the following
formula:
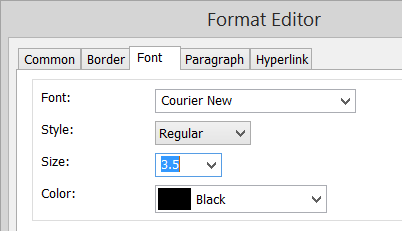
- If it is necessary to change the X dimension or barcode size, highlight
the object, choose Format Field, and change the font point size according to
the chart below. The point size must be small, generally 3 or 4 points. Because
the drop-down box does not contain these small sizes, they must be manually
typed in. The font selected for the object must be "Courier New" or another
mono-spaced Unicode font such as "Consolas" or "Lucida Console".

Point Size X Notes about point size and symbol distortion 2 08 Mils (.02cm) - To scan from
the screen of a Windows PC, the best sizes to use are 5, 10, 12, or 16 points.
- The X dimensions are doubled for 2D matrix symbols such
as Data Matrix and QR-Code. For example, a QR-Code printed at
5 points will have an X of 40 Mils.
- The X dimensions are approximate and may change with different resolutions of printers and screens.
- When using a 203 or 300 dpi thermal printer the point size should be 2.5 or 5 points. To better support low-resolution printers, download the Universal 2D Font and install the “IDAutomation2D S” font from the package. After installation, select the “IDAutomation2D S” font instead of Courier New or Consolas to generate the symbols. When using the IDAutomation2D S font, refer to the Specifications to determine the point size.
2.5 10 Mils (.025cm) 3 12 Mils (.03cm) 4 16 Mils (.04cm) 5 20 Mils (.05cm) 6 24 Mils (.06cm) 7 28 Mils (.07cm) 8 32 Mils (.08cm) 9 36 Mils (.09cm) - To scan from
the screen of a Windows PC, the best sizes to use are 5, 10, 12, or 16 points.
- Run the report to verify barcodes are being properly created. Ensure the
object has been sized properly to contain the entire barcode. If the width of
the symbol is larger than the object, white lines and a distorted symbol will
appear.

- Print the report to verify that the barcodes are created properly and that they can be scanned with a scanner. If a scanner is needed to verify barcodes, IDAutomation offers USB scanners and the Barcode Decoder Verification App.
- It is normal to view some distortion of the symbol on the screen because
of low screen resolution. However, the barcodes should be accurate when printed.
If it is necessary to generate accurate barcodes for the screen, adjust the
point size slightly until the symbol appears without any white lines of distortion.

- To verify the proper encoding of GS1 Data, ASCII functions, and UTF8 Unicode, IDAutomation recommends the Barcode Decoder Verification App.
Common Parameters
Each symbology has its own .rpt code example included in the licensed download zip file. This code should be copied and pasted into the Formula Editor and then modified as needed. Below is a list of the symbologies and the parameters associated:
- DataToEncode - a string of data to encode.
- BarHeight - a numerical value that defines the height of the bars in .015-inch increments.
- IncludeCheckDigit - a True or False value that determines if a check digit will be calculated and included in the barcode.
- N_Dimension - the difference between narrow and wide bars. The default is 2.
- Segs - the number of segments in DataBar Expanded. A low even number such as 4 or 6 will stack the symbol.
- CodabarStart & CodabarStop - letters A, B, C, or D for start and stop codes.
- ApplyTilde & ProcessTilde - enable additional encoding functionality:
- FNC1 characters may be included with "~202" for Code-128 and with "~1" for Data Matrix or QR Code.
- ASCII Functions may be encoded with ~??? in Code-128 or with ~d??? in Data Matrix and QR Code where ??? is a three-digit ASCII code. With PDF417, ASCII must be encoded directly with the Chr() function.
- ~m?? calculates a MOD10 check character, commonly used
for GS1.
- Example: ~2020000801234999999999~m17
Encodes: (00) 008012349999999997 - ~f?? calculates a MOD43 check character, commonly used
for HIBC.
Example: +A123BJC5D6E71~f14
Encodes: +A123BJC5D6E71G - ~k?? calculates the MOD37-2 check character in brackets
for the HRI object, commonly used for
ISBT manual entry.
This option will not encode the check character within the barcode.
Example: G123412654321~k13
Encodes: G123412654321 [L] - ~CO in QR Code enables Center Override commonly used for the Swill QR Bill to change the center of the symbol.
- TLV Base64 - In QR Code, when the first character is | then automatically encode TLV values separated by | in Base64, for example:
Example: DataToEncode = "|SellerName|VNumber|DateTime|Total|VTotal" - TLV - In QR Code, when the first two characters are ^| then automatically encode TLV values separated by |
- Base64 - In QR Code, when the first character is = encode the DataToEncode in Base64 excluding the =
2D Specific Parameters:
- processTilde - encodes ASCII with ~d??? and FNC1 with ~1. Not applicable to PDF417 which must encode ASCII directly with the Chr() function. For example, DataToEncode = "StaticData" & Chr(13) & ({Table.Field})
- PreferredFormat - generates the symbol size as defined by the corresponding number as outlined in the rpt file.
-
EncodingMode - is the encoding mode (ASCII, BASE256, TEXT, C40).
- E_BASE256 = 0
- E_C40 = 1
- E_TEXT = 2
- E_ASCII = 3
- EccLevel - the Error Correction Level.
- ColumnSpecify - the number of columns for PDF417.
- RowSpecify - the number of rows for PDF417.
- PDFTruncate - the truncate PDF417.
| Symbology | Associated .rpt File | Parameters (may be modified within the formula) |
| Code-39 | Native - Code 39.rpt | DataToEncode, BarHeight, N_Dimension, and IncludeCheckDigit |
| Code 93 | Native - Code 93.rpt | DataToEncode and BarHeight |
| Codabar | Native - Codabar.rpt | DataToEncode, BarHeight, N_Dimension, CodabarStart and CodabarStop |
| Code-128 Auto | Native - Code 128 Auto.rpt | DataToEncode, BarHeight and ApplyTilde |
| Code 128 A | Native - Code 128 A.rpt | DataToEncode and BarHeight |
| Code 128 B | Native - Code 128 B.rpt | DataToEncode and BarHeight |
| Code 128 C | Native - Code 128 C.rpt | DataToEncode and BarHeight |
| GS1 DataBar | Native - GS1 DataBar.rpt | DataToEncode, BarHeight (Should be either 13, 24, or 34), and Segs |
| Interleaved 2-of-5 | Native - Interleaved 2 of 5.rpt | DataToEncode, BarHeight, N_Dimension, and IncludeCheckDigit |
| MSI | Native - MSI.rpt | DataToEncode, BarHeight, N_Dimension, and IncludeCheckDigit |
| Aztec | Native - Aztec.rpt | DataToEncode, processTilde |
| Data Matrix | Native - DataMatrix.rpt | DataToEncode, processTilde, PreferredFormat and EncodingMode |
| PDF417 | Native - PDF417.rpt | DataToEncode, EccLevel, ColumnSpecify, RowSpecify, and PDFTruncate |
| QR-Code | Native - QR-Code.rpt | DataToEncode, ProcTilde, Version, EncMode and ErrorCorrectionLevel |
| USPS Intelligent Mail (IMb) | Native - USPS IntelligentMail.rpt | DataToEncode As String |
| USPS Postnet | Native - Postnet.rpt | DataToEncode and IncludeCheckDigit |
- HRI Options - The HRI object may be used with all
ApplyTilde options to display GS1 element strings or format text for HIBC
or ISBT.
Examples:
GS1-128 encoding: ~20201095011010209171719050810ABCD1234

GS1-DataMatrix encoding: ~101095011010209171719050810ABCD1234
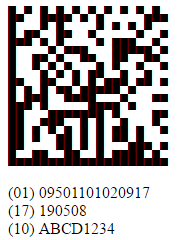
Example Video Encoding a Tab Function and Multiple Fields in a QR Code Symbol
Technical Support
Free product support may be obtained by reviewing the knowledgebase articles documented below and searching resolved public forum threads. Priority phone, email, and forum support are also provided within 30 days of purchase. Additional phone, email, and forum support are provided with an active Priority Support and Upgrade Subscription.
To verify the proper encoding of GS1 Data, ASCII functions, and UTF8 Unicode, IDAutomation recommends the Barcode Decoder Verification App.
Popular Forum Post Resolutions:
- How to test with the Demo Version
- Distorted barcode when using the Consolas font.
- Create GS1-DataMatrix Barcodes with the Native Generator
- Failure to Compile Error with QR-Code or USPS Intelligent Mail (IMb)
- Create a GS1-128 Barcode with FNC1 and AI Numbers
- Create SCC14 Barcode
- Create SSCC18 Barcode
Common Problems and Solutions:
- If scanning problems are encountered, verify a printer of 600 DPI or greater is being utilized. A large point size such as 5 points or greater must be used with low-resolution printers. To support low-resolution printers, download the Universal 2D Font and install the “IDAutomation2D S” font from the package. After installation, select the “IDAutomation2D S” font instead of Courier New or Consolas to generate the symbols. When using the IDAutomation2D S font, refer to the Specifications to determine the point size.
- Ensure the barcode can fit in the object. If the width of the barcode is
larger than the object, several white lines will appear.

- The font selected for the object should be "Consolas", "Courier New," "Lucida
Console" or other mono-spaced Unicode fonts.

A proportional font may also be used for some linear barcode types; however, it is not recommended. If a proportional font is used, change MonoSpaceFont = True to MonoSpaceFont = False in the formula.
The font may be adjusted with more precision, such as with the USPS Intelligent Mail Barcode, within the Format Editor - Font dialog. In most versions of Crystal Reports, this dialog is opened by right-clicking on the field and choosing the Format Field option.
- If several small question marks appear instead of a barcode when creating a PDF for performing other conversions of the report, it is an indication that the component performing the conversion is not Unicode compliant. In this situation, contact the component vendor to obtain an updated or Unicode-compliant version.
- In the event white lines appear in the barcode,
highlight the object and choose Format - Field - Paragraph. Adjust the line
spacing to the largest size that eliminates white lines in the symbol. Generally,
the setting of 0.8 to 0.95 is used for the "Courier New" font.
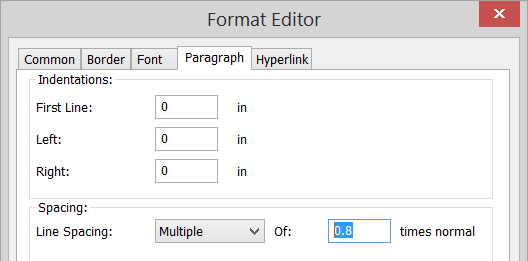
- If a 2D DataMatrix or QRCode symbol is not an accurate square, try using
the mono-spaced font "Consolas", a default font on Windows, and set the line spacing under the Paragraph tab at .95 or .99 times
normal.

- To remove line spacing in the image of the Data Matrix on the screen, try using the mono-spaced font "Consolas" and set the line spacing at .99 times normal.
- The Data Matrix and PDF417 Generators provided in the 2D version may generate slowly because of the complex algorithms used in these symbologies. IDAutomation recommends encoding 50 characters or less when using these symbologies. More data may be encoded, although the report may take longer to generate. To quickly generate 2D barcodes in Crystal Reports, use the supplied UFL in the IDAutomation Data Matrix Font and Encoder or the PDF417 Font and Encoder.
- If an error such as "A string is required" appears, the data will need to
be converted to a string with a crystal function.
For example: DataToEncode = cStr( {Table1_.NumberField1},0 ) - If it is desired to make the symbol smaller than the point size permits, download the Universal 2D Font and install the “IDAutomation2D S” font from the package. After installation, select the “IDAutomation2D S” font instead of Courier New or Consolas to generate the symbols. The IDAutomation2D S font will be about 1/2 the size of the system font.
- To encode ASCII characters and functions directly, use the Chr() function. Chr(13) is used for a return, Chr(9) for a tab, Chr(30) for RS, Chr(29) for GS, and Chr(4) for EOT. For example: DataToEncode = "StaticData" & Chr(9) & ({Table.Field})
* Note about USPS IMb: Due to limitations within Crystal Reports formulas, the complex calculations necessary require the installation of the IDAutomation UFL version 2015 or later. Installation of this UFL is automatic when running the installer for this product. In addition, a silent installer is provided with all developer licenses of this product to easily install the UFL when distributing reports. A separate installer is provided for systems that do not have .NET 2x-3x installed; this is provided in the ".NET Framework 4.5 UFL Installer" folder of the downloaded zip file.


