Native SSRS Barcode Generator User Manual
- Overview
- Native Embedded Generator (Located in the "SSRS Native Generators" folder)
- Server-Side Script Generator (Located in the "IIS Server Side Script Generators" folder)
- Creating a report with Reporting Services
- Integration with Microsoft Dynamics
- Technical Support
Buy License Support Download Demo Release Log
Overview
This product package includes both a Native Barcode Generator (which is embedded
in the report and runs natively) and a Script Generator (which streams barcodes
into reports from a server).
Native Embedded Barcode Generator (Located in the "SSRS Native Generators" folder)
- Embeds the barcode generator natively within the report.
- Draws the barcode image from a standard system font using patented technology.
- May be run locally without access to any other server.
- Encodes UTF-8 (a.k.a Unicode & Double Byte Characters) in Aztec, PDF417, Data Matrix, and QR-Code.
- QR Code supports Auto Mode, Base64 TLV, and image overlay as Center Override, commonly used for the Swiss QR-Bill.
- If UPC-A or EAN-13 barcodes are required, use DataBar Stacked instead or the Server Side Script Generator.
- May not work well when symbols are rotated to 90 or 270 degrees.
Server Side Script Generator (Located in the "IIS Server Side Script Generators" folder)
- Requires access to an aspx-enabled server hosting the script to display barcodes.
- The server hosting the script streams a barcode image into the report.
- Problems may occur with reserved HTML characters and UTF-8 because of the web interface.
- DotCode and Aztec are not available in the Server Side Script Generator.
- Works with rotated symbols.
Native Generator Installation
IDAutomation recommends using the Native Generator over the Script Generator. This tutorial provides a walkthrough of steps for generating barcodes in SQL Server Report Builder or Visual Studio .NET Report Designer for Reporting Services.
Report Designer Compatibility:
- Visual Studio .NET 2008 and up
- SQL Server Reporting Services (SSRS) 2008 R2 and up
- Microsoft .NET Framework 3.5 and up
Report Builder Compatibility:
- Report Builder 3, SQL Server 2008 R2 and up, including Report Builder 2016
- Microsoft .NET Framework 3.5 and up
Installation Tutorial
The files for the Native Generators are located in the "SSRS Native Generators" folder of the product zip file. RDL files are also included as an example, which should be referred to if problems are encountered with implementation.
- Open the custom code section of the report:
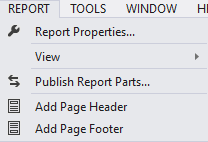
- Visual Studio .NET Report Designer users: The native
generator can only be installed into existing reports. Refer to the
Creating a Report tutorial, if there is
not an existing report. Select File - New - Project. To activate
the Report menu in the VS .NET IDE, click on the body of the report. Select
Report - Report Properties - Code.
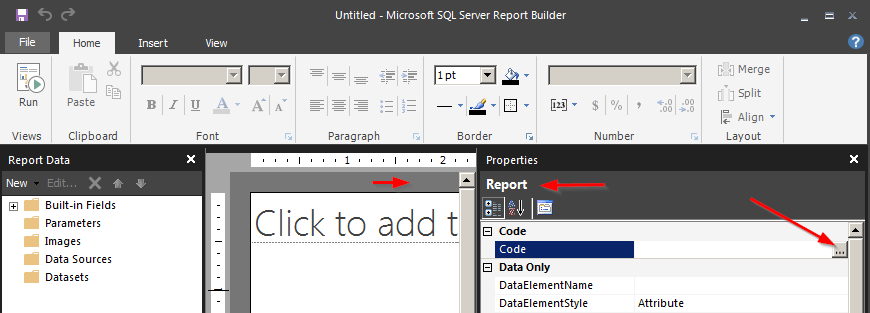
- Report builder users: Choose File - New - Report
and open the report custom code. If the Report Properties dialog does not
appear, click on the gray area of the report.
- Visual Studio .NET Report Designer users: The native
generator can only be installed into existing reports. Refer to the
Creating a Report tutorial, if there is
not an existing report. Select File - New - Project. To activate
the Report menu in the VS .NET IDE, click on the body of the report. Select
Report - Report Properties - Code.
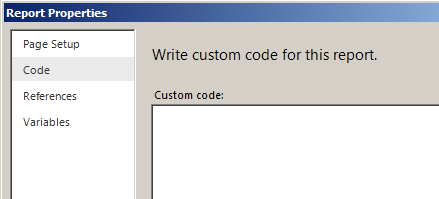
- The code area of the report should now appear as:
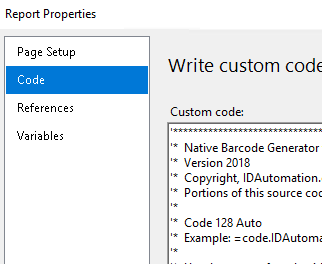
- Open the desired barcode type text file from the SSRS Barcode Generator download, such as IDAutomation SSRS Native - Code 128.txt.
- Copy the contents of the file and Paste the code into the
custom code area and choose OK. This places a custom function
in the report that can generate the barcode. Save the report.
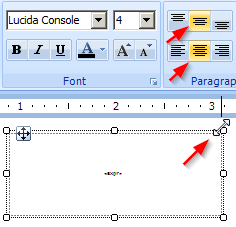
- Add a Textbox where the barcode is needed or locate an existing text field
and size it to be large enough to contain the barcode generated. If the Textbox
is not large enough, the barcode will be very distorted. To produce
the required quiet zone or the space around the barcode, it is recommended
to choose the paragraph center options.
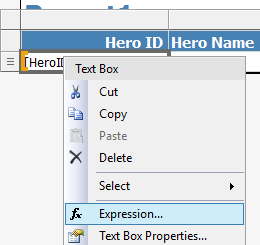
- Right-click on the Textbox and select Expression. This is where the
custom code is executed and the resulting barcode will be placed within the
Textbox. In design mode, the expression will appear as «Expr» .
- Set the expression to include the barcode generation formula:
=Code.IDAutomation_SSRS_Code128(Fields!HeroID.Value)
replacing HeroID with the data that needs to be encoded in the barcode and select OK. To obtain the formula for other barcode types, refer to the example listed at the top of the associated .txt file.

- Select the field and set the font to Lucida Console (Data
Matrix & QR Code use Courier New) at 4 points. The point size
of 4 sets the X Dimension of linear barcodes to 16 mils and 2D barcodes to 24
mils. If a different X Dimension is needed, adjust the font point size accordingly
from the chart below. Use 3 points for USPS IMb for 24 bars per inch. How to set unique point sizes
NOTE: Ensure the report background is white and the font is black.

Point Size X Dimension Notes about point size and symbol distortion 2 08 Mils (.02cm) - Use 3 points for USPS IMb and 1.75 points for small DataBar
symbols.
How to set unique point sizes - When using a 203 dpi thermal printer the point size should
be:
For linear barcodes: 2.4, 4.8, 7.4, or 9.8.
For 2D and DataBar: 1.75, 2.6, 5.25, or greater. - If distortion is noticed, slightly adjust the point size up or down in .1 point increments until a correct symbol is obtained. How to set unique point sizes
- To scan from the screen of a Windows PC, the best sizes to use are 10, 12, or 16 points.
- X dimensions are doubled for DataBar, Data Matrix, and QR-Code. For example, a QR-Code printed at 5 points will have an X of 40 Mils.
- X dimensions are approximate and may change with different resolutions of printers and screens.
- If good results cannot be obtained with system fonts, download the Universal 2D Font and install the “IDAutomation2D
S” font from the package. After installation, select the “IDAutomation2D
S” font instead of Courier New or Consolas to generate the symbols.
When using the IDAutomation2D S font, symbols will be about
1/2 the size of the system font.
2.5 10 Mils (.025cm) 3 12 Mils (.03cm) 4 16 Mils (.04cm) 5 20 Mils (.05cm) 6 24 Mils (.06cm) 7 28 Mils (.07cm) 8 32 Mils (.08cm) 9 36 Mils (.09cm) - Use 3 points for USPS IMb and 1.75 points for small DataBar
symbols.
- Save the file and Preview the report.
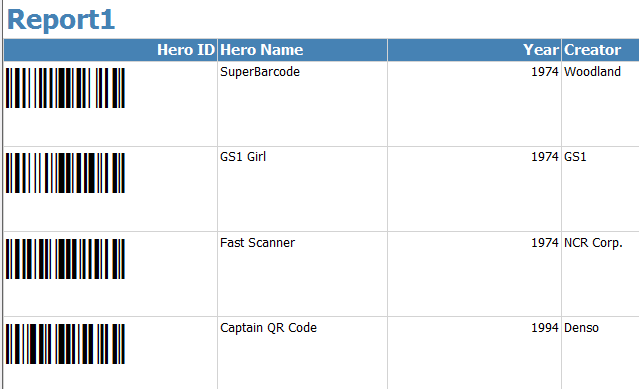
- To deploy Visual Studio .NET Report Designer solutions to the Report Server, select Build - Deploy Solution. For guidance about how to set up deployment, refer to Microsoft's How to Set Deployment Properties article.
- For testing purposes, IDAutomation offers the Barcode Decoder App. This app is particularly useful in verifying lower ASCII codes, GS1 data, and UTF-8 in QR code.
Options
- Setting Optional Parameters
and Properties: These may be set in the =code expression or in the
custom code area. These parameters should only be set when necessary.
- To set a parameter in the =code expression, place a comma after the
field data and enter the value, for example:
=Code.IDAutomation_SSRS_Code128(Fields!HeroID.Value,12) - To set a default parameter in the custom code area, open the report
custom code locate the "Public Function" statement, and change the desired
default value.

- For linear barcodes only, when changing the "BarHeight
=" variable, the size of the object must also be increased so that taller
barcodes may be contained. The approximate height is determined by the following
formula:
Height in Inches = (Font Size) * (BarHeight) * 0.015
Height in CM = (Font Size) * (BarHeight) * 0.04
For example, the default BarHeight of 8 equals about 0.3 inches and 1 centimeter.
- To set a parameter in the =code expression, place a comma after the
field data and enter the value, for example:
- Encoding Multiple Fields:
Multiple fields and static text may be combined and encoded in the same barcode
in VBA code format. For example,
=Code.IDAutomation_SSRS_Code128("IDA" & Chr(9) & Fields!HeroID.Value)
Encodes the text IDA, a tab function, and the result of the HeroID field. The static text must appear in quotes and all information is concatenated with the ampersand (&) symbol. - Data Type Conversions: If the data in the field (HeroID in this case) is not stored as text it will need to be converted into a string before encoding, for example: Fields!HeroID.Value().ToString()
- Generating Multiple Barcode Types: If it is necessary to generate multiple barcode types on the same report, copy the function of the other barcode type needed into the code area (steps 3 and 4 above) under the function that already exists and update the expression, as in step 7 above.
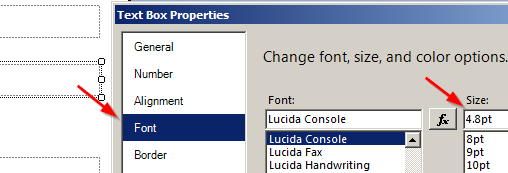
- Setting Unique Point Sizes:
If the point size needs to be adjusted below 8 points or as a non-integer value,
it is necessary to right-click on the barcode field, choose Text Box Properties,
type in the number, and then choose ok.
Native Generator Parameters
Parameters may be modified as necessary. Click the links of the following parameter properties list for more details.
- DataToEncode (String) - the data to be encoded in the barcode.
-
ApplyTilde (Integer)
QR Code in version 2022 or later of this product contains additional functionality when ApplyTilde is true:
Center Override - changes the center of the symbol - refer to the Center Override FAQ.
TLV Base64 - when the first character is | then automatically encode TLV values separated by | in Base64, for example:
Example: "|SellerName|VNumber|DateTime|Total|VTotal"
TLV - when the first two characters are ^| then automatically encode TLV values separated by |
Base64 - when the first character is = encode the DataToEncode in Base64 excluding the = - BarHeight (Integer) - height of the bars in a linear (1D) symbol that is a multiple of X.
- ForceBinary (Integer) - forces binary compaction in PDF417 instead of ASCII compaction when set to "1".
- IncludeCheckDigit (Boolean) - The IncludeCheckDigit parameter determines whether a check digit should be automatically calculated and included. Valid values are True and False. Applicable to ITF and Code 39, the default is False.
- N_Dimension (Number) - determines the width of the wide bars when applicable for ITF and Code 39, which is a multiple of the X dimension. Valid values are 2, 2.5, and 3. The default is 2.
| Symbology | Associated File | Parameters (Defaults should be changed within the custom code) |
| Code-39 | Code 39.txt | DataToEncode, BarHeight, N_Dimension, IncludeCheckDigit |
| Code-128 Auto | Code 128 Auto.txt | DataToEncode, BarHeight, ApplyTilde |
| Code 128 A | Code 128 A.txt | DataToEncode, BarHeight |
| Code 128 B | Code 128 B.txt | DataToEncode, BarHeight |
| Code 128 C | Code 128 C.txt | DataToEncode, BarHeight |
| Interleaved 2-of-5 | Interleaved 2 of 5.txt | DataToEncode, BarHeight, N_Dimension, IncludeCheckDigit |
| Aztec | Aztec.txt | DataToEncode, ApplyTilde |
| Data Matrix | Data Matrix.txt | DataToEncode, ApplyTilde, EncodingMode, PreferredFormat |
| DotCode | DotCode.txt | DataToEncode, ReturnType, ApplyTilde, Ratio |
| PDF417 | PDF417.txt | DataToEncode, ApplyTilde, ForceBinary, EccLevel, ColumnSpecify |
| QR Code | QR Code.txt | DataToEncode, ApplyTilde, EncodingMode, ErrorCorrectionLevel |
| USPS IMb | USPS IMb.txt | DataToEncode |
| GS1 DataBar | GS1 DataBar.txt | DataToEncode, BarHeight |
| GS1 DataBar Stacked | GS1 DataBar Stacked.txt | DataToEncode, BarHeight |
| GS1 DataBar Expanded | GS1 DataBar Expanded.txt | DataToEncode, BarHeight |
- If UPC-A or EAN-13 barcodes are required, use DataBar Stacked instead or the Server Side Script Generator.
Server-Side Script Installation Tutorial
The server-side script adds barcode generation capability to SSRS by streaming
barcodes into the report.
This implementation requires access to an aspx-enabled server hosting the script to display barcodes.
- Download the product file and copy the script files to an ASPX-enabled web server such as IIS. Each file contains the name of the supported barcode symbology.
- Open the URL to the file in a browser window and verify that a default barcode appears, this will be your unique SSRS Generator URL. If a symbol does not appear, verify the files are installed in the proper folder on the server and confirm that ASPX script processing is active in the folder where the file resides.
- Use the unique SSRS Generator URL obtained above with the applicable Report Designer or Report Builder Tutorials.
- Refer to the SSRS Barcode Generator Service for all server-side script parameters; they are the same parameters used in this product.
The script is also available as a service hosted in IDAutomation's fault-tolerant server cloud. The service is an easy way to generate barcodes without installing any software.
Script Parameters
Refer to the SSRS Barcode Generator Service for all parameters; they are the same parameters used in this product.
Creating a Report with Reporting Services
The following tutorial is a basic example of a report that can be created with Reporting Services. For additional information and examples, refer to the Microsoft Reporting Services (SSRS) Tutorial and related documentation.
- Select File - New - Project.
- In the Templates, select Business Intelligence - Reporting Services -
Report Server Project Wizard.

- Name the project and select OK.
- In the Select the Data Source window, select New data source, create a Name,
set the Type of data source, and choose Edit.
- In the Connection Properties, select the Server name; log onto the server;
select or attach the database, and select OK.
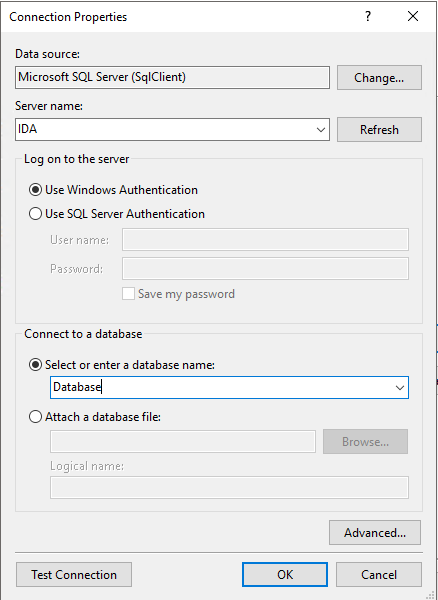
- To verify the connection is successful, select Test Connection. The
test results should display Test connection succeeded. Choose OK and
Select Next.
- In Design the Query, select Query Builder.

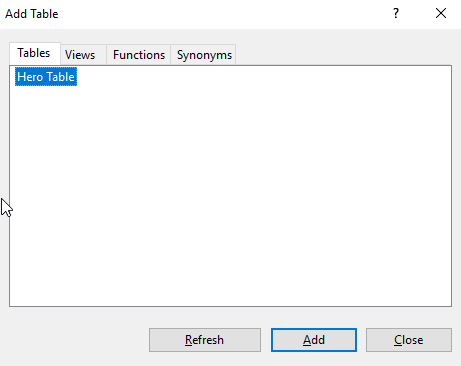
- Select the Add Table icon.

- Choose the Table and click Add. Select Close.
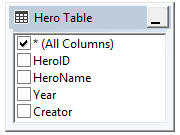
- Place a checkmark in the box in front of the fields to include on the report
and select OK.
- Once the query string is set, select Next.
- Select the report type and choose Next.
- In the Design, the Table window, move the Available fields to the Displayed
fields text area by left-clicking the field and select Details >
Next.
- Choose the table style for the report and select Next.
- Set the Report Server Version, Report Server, and Deployment Folder, and choose
Next.
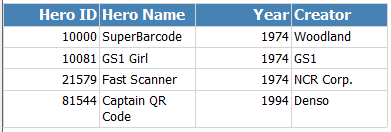
- Create a name for the report and choose Finish to complete the wizard.
Technical Support
Native Generator Related Issues
- Native Generator for SSRS displays boxes instead of a barcode.
- How to test the demo version of the Native Generator.
- Distorted barcode when using the Consolas font.
- Barcode does not appear - double-check all of the steps in the tutorial and make sure the text being sent to the function does not contain invalid characters or any data types other than a text string.
- 2D Barcode is not square - depending on the implementation the font selected can slightly change the size. The Courier New font can sometimes appear taller and Lucida Console can sometimes appear wider. Both fonts will create a barcode that will scan. Choose a font that appears more square.
- To Support Low-Resolution Printers or make the Symbol Smaller than the point size permits, download the Universal 2D Font and install the “IDAutomation2D S” font from the package. After installation, select the “IDAutomation2D S” font instead of Courier New or Consolas to generate the symbols. When using the IDAutomation2D S font, the result will be about 1/2 the size of the system font.
Server Side Script Related Issues
- View the IIS Application Pool Best Practices for better performance.
- Barcode Image not Generating: Open the System Status Site and verify the barcode generators are all operational. The service may be tested by accessing the barcode URL directly. For example, https://www.bcgen.com/ssrs/demo-c128.aspx should create a default barcode image.
- The purchased version of this product does not contain a watermark. If it is desired to have a watermark in the purchased version, the demo portion of the code may be edited to enable this feature with a text message. For example:
Const Demo as Boolean = True
Const DemoText as String = "My Message" - Slow Performance when Generating Multiple Barcodes: If a large number of barcodes are generated from the same system at the same time, some latency may be noticed. If this is an issue, consider installing the SSRS Generator Script locally or on an Intranet. Performance over multiple clients should not be an issue. A performance test performed in 2017 shows an average response time of 33 ms for 2000 clients requesting barcodes during business hours.
Additional Support
- Review Resolved Incidents or the following support tags: Stream-barcodes | Streaming
- Open an Incident
- Contact IDAutomation
- For assistance with other SSRS issues, refer to Microsoft Support for Business Site or the Microsoft SSRS TechNet Forum.

